Saturday 25 December 2021

Tumbarumba Goods Shed - revisited

 Tumbarumba Goods Shed - Take 2

Shortly after I had finished my construction of a goods shed for Tumbarumba around 3 years ago, it was correctly pointed out that I had made a big goof - I had used the wrong kit.  I had used a Bergs  G1b kit, but I should have used the smaller G1a kit.

One of the reasons for writing this blog, was for information exchange.  And I have been rewarded with contacts from knowledgable people, a large number of photographs.   Fortunately, there have been a few published in the "Tumba Rail" booklets, although images on the internet are rare.  


Still my only picture of the goods shed - I took this one in 1980.

The goods shed I had made (described on the earlier blog-post),

   https://buildingwagga.blogspot.com/2017/09/tumbarumba-goods-shed.html

was not right, so in some ways, I welcomed the opportunity to make a new shed

My initial build - probably closer to the Bergs instructions than I should have done.  Still an acceptable model, but it isn't Tumbarumba.  I plan to reuse this shed at Humula - the Railways track plan there shows a goods shed of the same size as a G1b, and good enough for me, although I have never seen a picture, and may not have been constructed at all

The new build

A few months after realising my mistake,  I acquired a Bergs G1a goods shed from ebay, and made a start on construction.


The techniques are similar to the ones used on the original build, although I did use a micromark magnetic clamp system for the basic shed. 

However, my desire was to make new models, and the partially made kit was placed into a plastic storage tray, and moved to one side.

A long time (a few years) later

Whilst I should be powering ahead with Wagga station, I was getting far too many interuptions for a concerted effort to complete (read kitten, gardening, lawn mowing, etc), the goods shed was something smaller, and taking up space on the workbench - mocking me to complete.

So, its time had come.

The build resumes

All of the metal corrugated sheets were attached to the wood the same way

Some foam added to the roof.  The foam block is a gentle way of providing a clamping grip over a large area.  I used white glue, rather than contact adhesive, for the metal, on wood join, as the latter does not provide any ability to reposition if you have not quite got the metal located correctly

A suitable weight on top of the foam block plus gravity is all the force needed


After the glue had dried, the metal roof is secure

One of subtle differences in the two sheds, was the supports.  The bergs kit assumes wooden piers, the Tumbarumba shed actually has brick piers.  I had made brick piers before for the Ladysmith goods shed - by wrapping superquick brick papers around square wooden pegs.  This time, try a new technique.

I cut 20 piers from Evergreen styrene using my mains powered 400 watt table saw.  This saw was a covid lockdown purchase from a company in Melbourne.  I think the saw is actually made in Australia.  The beauty of this saw is that it allows me to get a 90 degree cut on the styrene, something that I found near impossible to do just with hand tools

I cut a strip from the Slaters brick sheet styrene

Positioning the evergreen pier on the back of the slaters styrene strip shows me the material I have to bevel.

The pieces needed to make just one pier

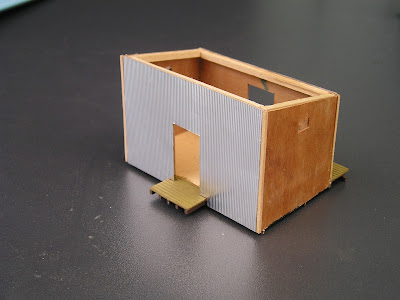
Piers in position.  The set of steps was scratchbuilt from styrene strip, to be a clone of my original steps made from wood.  And in a departure from other small models I have made, I used a 0.040 thou styrene base for the shed.  After the piers had dried, the steps (just there for the photo) will be removed, and the whole lot turned upside down, and sanded to a uniform height on a sheet of glass paper.


The as yet unfinised shed on the base to test the positioning of the steps (held in position with a dab of blue-tac).  It will later be secured with styrene cement

Finishing


Downpipe made from sytrene rod, cut and reglued to get the angles.  Secured to the wall with white glue


All parts now painted, awaiting weathering, positioning on the layout, and blending in the scenery.  The shed has been tacked to the piers with 4 dabs of white glue - to enable easy removal for the future scenery work


I have had a lot of fun finishing this model.  I tried out some new techniques, and happy with the end result.  Whilst, I may now prefer to build in just styrene, rather than a composite materials, it is good to not loose those skills.


Conclusion

Looking around my workbench, I note quite a number of unfinished projects - (eg. silo for Ladysmith, water tank for Borambola, lamp building for Bomen, DJH D50), and as a new years resloution, finishing these will be the goal.  I will let you know how I go via the blog.


And finally, a couple of extra pictures.

*

Bomen lever frame - under construction, by Tony, of Mackenzie in HOland. Tony visited me last week to show off his progress.


Trouble kitten on her Xmas present.  Assembling the Cat Tree was a bit more of a challenge, as the Chinese made kit, contained just a colour picture, the parts, and an inventory of parts.  Still, Trouble was happy with the end result.

All the best for the festive season, and the upcoming year.  

Until next time

Saturday 4 December 2021

Wagga Station - Front entrance awning

 Wagga station - Awnings continued (Front Entrance)

I was overly optimistic after the first awning was installed, that the experimentation had finished, and it was smooth sailing ahead.  Well, it didn't turn out that easy.


Wagga station - front roadside entrance, as it appeared in 2019, after the latest heritage makeover. 


Doors.

Prior to the awnings going in, it was time to make some doors to fit the doorways.  There are a lot of doors, but the techique is the same


West roadside veranda - concrete floor made in a similar way to the eastern side. The doorway is on the gable wall

Here is how the door appears today.  The dark brown colour now, is not the tan/buff colour of the Red heritage paint scheme

The door built on clear styrene. The yellow post-it-note has the tracing of the doorway opening. I covered this in an earlier blogpost. I used Tamiya Buff for the door colour - close 

Fitted, in position.  

Inclined ramp

Wheelchair access, means no steps. 

I don't have a blow-by-blow on this one.  Essentially, it is 2 sheets of 0.040 thou styrene, with wedges to maintain the curve.  But there is a trick.  The uppermost styrene sheet has been pre-bent, using a technique I think is called knurling - a series of parallel knife cuts on the underside forces the styrene to bend gracefully.  It is a technique I have used to bend planks for ship modelling.

The ramp positioned to extend from the bottom of the doorways, to the curb of the future road.


Ironwork and roof

Take the front entrance etches from the fret, and bend, whittle, and make it fit the 9.6cm wide opening

Position the column bases, using the etch tabs, on the styrene base. 

Add the columns. These were made using the technique I described in a previous blogpost. Check the height - the side "stonework" blocks

Start making the decoration for the awning roof.  The white plank above the doorways is the roofline positioning mark.  It is secured with small screws, for later removal prior to painting

All those little corbels are fiddly at best

After gluing in the corrugated roof, the awning can be removed for the next stage, which fortunately, occurs on the workbench

Relocated back after fitting the missing sections of the awning roof. This is my third attempt at cutting out these triangle shapes. The first time, the peak of the roof was not horizontal, the second attempt, the peak of the roof was off at an angle to the walls. The third attempt was better, and good enough for me


Post-it notes make good templates.  To get the angle right for the reinforcing styrene, I ensured the post-it-note fitted without gaps.  The template also good for the gable end

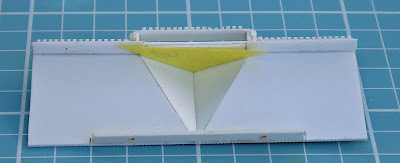
Making the gable end for the front entrance was tricky, with lots of custom cut pieces of styrene, for the trim.  However, looking at this picture, and comparing it to the prototype at the front of this blogpost, I might have to make some adjustments to the triangle feature.  Still, it is good to see how visible the entrance doors are.

Another minor issue, was that the roof capping "melted" in spots, as I might have flooded too much styrene cement. Unsure if I fill with putty, or simply lift the melted strips, and replace.


Progress is a bit slow, but one has to work at ones own pace, and priorities.  Again, much thanks to Ross Balderson for the etch artwork, and Badger Bits for arranging the etching.

Until next time.


Trouble, the now 2 month old kitten, has taken an interest in my typing on the keyboard - and is another reason, why progress has been slower than I would hope. 


Sunday 14 November 2021

Farewell to Kangaroo Valley Historic Railway ?


Farewell to Kangaroo Valley Historic Railway


Last weekend, I drove to Yass, to participate in the final operating session on Stephe Jitt’s “Kangaroo Valley Historic Railway”.  After this session, the layout is being dismantled, and faces an uncertain future, as Stephe’s property, “Old Linton” has been sold

Old Linton homestead was originally built in 1857. It has had a long, and chequered life, with expansion, and improvements - just like KVHR


My involvement with the layout dates from the 1990s.  Stephe approached the ACT Model Railway Society, with an offer of an exhibition layout for the upcoming Malkara Model Railway exhibition.

At that stage, I was on the Malkara exhibition committee, and took it upon myself to inspect the layout.  I liked what I saw, and the layout was duly exhibited.  Stephe later joined the ACTMRS, and regularly offered Kangaroo Valley as the stand-in club layout for other exhibitions, which allowed the members of the society to run Australian trains, in an Australian setting.

Those who know me understand that I tend to look at possibilities, and possible improvements of any model.  Kangaroo Valley as originally built, had some awkward crossover trackwork, and operation of the mine branch, seriously impeded the running of the main line.  Maybe I was a bit too convincing, as Stephe took on some of  my suggestions, and the 3 way point, and double slip were installed, and the platform 3 dead-end track was extended to the holding yard.

The town of Kangaroo - on the original two modules. 

Stephe later added a meatworks and leather tanning industry to the front on a new section, whilst vastly increasing the “fiddleyard” at the rear. 

Meatworks, and ice plant.  The backscene was painted by the same artist who painted the original backscene behind the Kangaroo town modules

My last enhancement to the layout, was to add 4 buildings to the Kangaroo township, to give the town more of a Bundanoon feel.  Well that was my excuse to contribute something of my own to the layout


For those with copies of Australian Model Railway magazine, Stephe wrote an article on Kangaroo Valley Historic Railway,  which appeared in Issue 292, Feb 2012.


AMRM No. 292 February 2012

Kangaroo Valley
Volume 25, issue 292, page 16.
Type: Model Railway Layout
Author: Stephe Jitts
Published: 01/02/2012


After the article was written, Kangaroo Valley Historic Railway was totally transformed from an exhibition layout, into a permanent home – being the former hay loft of Old Linton.  Stephe quickly filled the space of the loft with more track, and incorporated Kangaroo Valley as just a town within a much larger east coast mainline stretching from Sydney to Eden (and beyond in staging).

Stephe liked to share his layout, and regular once a month operating sessions were firmly placed on the calendar.  Although, the Covid situation this last 2 years has not helped,  I only got to the occasional session – I was often tied up with dog-show duties, the 2 hrs there, and 2 hrs back, plus the expense of fuel were not conducive to a more frequent attendance.  Probably my loss.  But it does give me a lesson, that I may not get operators for my future Wagga layout.  ‘Build it and they will come’  is a not always a good recipe for success For the last session on KV, too many operators was the problem, and the sessions were split into 4 x 90 minute blocks, with some operators able to leave, and be replaced with newly arrived operators.

“Old Linton” homestead was recently sold, after being on the market for many years.  It was the subject of a feature “Selling Homes Australia” television program a few years back.  I don’t think Stephe thought it would sell, as Kangaroo Valley Historic Railway steadily grew into it’s new home – and scenery, and electronics kept improving, and evolving.    My record of its growth has been a bit patchy, and disappointingly,  I forgot to pack my proper camera to record this last melancholy event.  But I did have my phone camera, which I hope will show some of the improvements that have occurred over the years


Tannery is another industry associated with the meatworks. I was very interested to see this, as my future Wagga layout will also have a tannery at Bomen

Engine facilities at Kangaroo Valley are small, but cover all the basics.  Stephe uses LENZ DCC, which takes some getting used to.  Many of the points(turnouts) are DCC controlled, although Kangaroo Valley has a dedicated signalbox operator, and shunter, that assists in making, and breaking up trains. 


A long aisle now separates Adamtown from KV. This picture taken a few years ago. The operators on the left are working Sydney, and Eden fiddleyard. Unfortunately, I don't have pictures of the yards, but there is a good picture of Stephe working the earlier incarnation of the fiddleyard in AMRM 


Looking the other way towards an industrial area, Adamstown has developed scenically, now has catenary, and Kangaroo Valley operations now has an electric commuter train that runs from Sydney Yard, to Voilet 


Gasworks at the end of the Adamstown aisle.  Picture taken before the catenary installed on the mainline

A warehouse, on the gasworks siding. This is a recycled building that I built for the ACT Model Railway society from a Heljan Bank building kit in around 1987. Stephe had no idea of the history when he obtained the building from the ACTMRS when they were clearing out their old EHO guards van.  I am glad it found a new home


After Adamstown aisle, the tracks disappear around the entrance door, and reappear in another industrial area, this one of a port scene.  This area was a future scenery project


Voilet was the end of the catenary.  It was also the junction for a small industrial branch to Limestone.  The Limestone local is awaiting the signal prior to departure to Kangaroo Valley.

Basic Scenery for Limestone in this early picture. The carriage shed is used to stable the CCA carriage

More scenery has been added in this later picture.  The 13 class appears to be the main motove power.  Stephe had fitted a very good keep-alive in this loco, and is most reliable

My phone camera picture from last weekend shows ballasting complete.  The line extends to the right of this picture to a limestone quarry - a source of revenue for the railway 


From Voilet, the line passes over a river on a 159 foot Whitton Truss bridge.  The trackwork here is gauntlet


Scenery makes the difference

After the bridge, the line runs to the Cement works.  This is the destination of the Limestone Ballast train.  Note the structure above the tunnel. This is part of the original exhibition layout - the destination of the coal branch out of Kangaroo Valley.

This is what the section from Limestone to Cement works looks like. The limestone quarry is above the mainline tunnel on the right - Voilet  and the river bridge are in the distance, and the cement works on the Left, just out of view

Another branchline connects to the mainline at Kangaroo Valley. This one disappears behind the meatworks, only to skirt the walls and emerge on a new deck on the other side of the hay loft room.  This is the station of Ethyl, on the "Alabmob" branch

Alabmob is the site of a milk factory. Always a good source of revenue

Alabmob station in the plywood central days, before scenery


With more scenery. My poor phone camera however shows the waybill pockets as part of the operation.  Eagle eyes will also notice that the station building has been replaced, and relocated across the tracks.  Changes were a feature of this layout over the years


The mainline headed south out of Kangaroo Valley, and beneath Ethyl, and the Alabmob branch, had more of an industrial feel.  These were only recent additions.

The meatworks needed a saleyards. This had a long siding small connection from the Meatworks near Kangaroo valley.  Below this area, there was hidden staging for the "melbourne" connection out of the Eden fiddleyards


What is in the future.  As Stephe said in his AMRM article, “Crystal balls are difficult to read, and if I have learnt anything in the last twelve years, it is that change is constant”.

Stephe hopes that KV will rise again in a new location, probably a larger shed, which will address some of the hay loft constraints, particularly the access, and aisle width.

Stephe's workshop, and stairway(ladder) to the layout in the hay loft

The layout upstairs made everything worthwhile - but we are not getting any younger, and entrances such as this are best avoided

A final look at Kangaroo - with a historic set of trains.


Until next time.