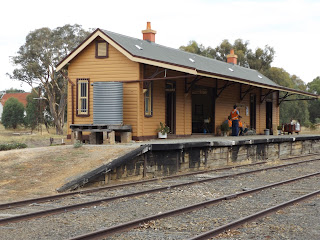
Ladysmith station was the 2nd station on the Tumbarumba Branch, after leaving Wagga. The railways considered the station reasonably important, as it was built to their A4 design. After trains stopped running in the late 1980s, the station's future was uncertain, but the lease was taken over by the Tumba Railway group, and the station is now looking very nice. In May, 2017 the station turned 100
As expected, the 2017 condition is slightly different from the 1970 era that I want to model. My pictures taken in 1980, as well as the picture in the Train Hobby book "NSW Branchlines Volume 2 show a similar heritage scheme to the one today, although the mustard colour today is darker than the foremetioned pictures. The 1970 colour might have been closer to the white of the station at Tarcutta? However, I cannot find a 1970 picture, so I am proceeding with the heritage scheme.
I thought I would buy a laser cut kit of the NSW A4 station kit from Model Train buildings http://modeltrainbuildings.com.au/
I had hoped that a kit would be a simple way forward, as well as giving me a clue on enlarging and modifying their Tenterfield Statiun kit, to fit the Wagga station
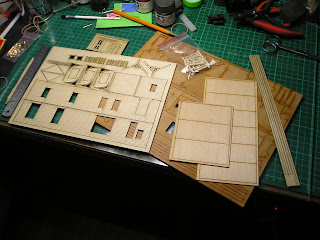
The kit was ordered, and arrived promptly. The package included a number of laser cut sheets, instructions, and 4 Grandt Line windows, plus glazing. The instructions were fairly rudimentary, so access to Greg Edwards Data sheet is pretty useful. Oh, and I also had taken a lot of detail pictures of Ladysmith
The instructions recommend painting prior to assembly. I used the following paints
Floquil Depot Buff for the walls, Floquil, Rail Brown for the floor, , and Floquil Roof Brown for the trim. I know that Floquil is no longer available, but it is important to NOT use a water based paint, unless one has sealed the wood. Floquil being a lacquer was brushed straight on
The fit of the parts is excellent. I used white glue. The above picture was taken AFTER I discovered discrepencies with the Kit, vs the Data sheet. My photos of Ladysmith showed it closer to the A4 design.
Whilst I decided to live with the roof pitch, and door location to the stationmasters office, the windows to the Ladies Powder room, and Lavatory were very wrong - wrong size, wrong shape, and wrong position, so needed rectification. Fixing these took a lot longer than I had hoped There were some other problems too, but no others involved surgery
Before the roof goes on, it was necessary to fit the seats in the waiting room. The kits seats are nowhere as neat as the real ones (above), but for an interior detail, it is OK.
The main roof consists of 4 beams, and 6 corrugated iron wooden sheets. The rear sheets have been fitted and glued. I plan to leave the other sloping sheets and two beams removable, for later super detailing of the interior.
It may be silly to fit awnings on the rear of the station, as my layout will have the station visible only from the platform face, but the awnings are a necessary detail, which I needed to have.
The kit supplies NOTHING, which is a shame, as the awning brackets would have been an ideal task for the laser cutter.
There are 4 windows. Assembly sequence is from right to left
- drill holes for the brackets, and fit stripwood (I used Northeastern 3" square stripwood) in `the holes to approximate the awning design
- Cut and fit support wood between the earlier stripwood
- Fit window, after painting, and glazing (the glazing supplied in the kit is laser cut, exactly right - a very nice touch, which beggars the question why the awnings are omitted?)
- Fit corrugated iron. I made mine using Brunel Hobbies HO corrugated iron maker jig, and some disposable aluminium tray material, that came from Coles underneath some yummy treats. The tool works extremely well, and is recommended
Well that is it for now. I have a distraction with track laying on Pete's Hobby Railway, (a real 610mm gauge) so part 2 of Ladysmith may be a few more days away.
Cheers. Rob
Built to the NSWGR A4


