Monday 27 May 2019

The Auscision RUB sets


The Auscision RUB sets - A quick review.

As anyone who has been reading my blog over the last few months, knows that I have a fascination for NSWGR RUB carriage sets.  So, it should come as no surprise, that I had not one, but two 8 car RUB sets on order from Auscision.   And finally, after what was probably a 3 year wait, they arrived in my PO box this morning.


First impressions are a solid box, with nice artwork – as we have come to expect.  Inside, the 6 car set is sturdily secured in plastic.  As I had ordered an 8 car set, the remaining 2 carriages are packed in a separate box.  The sets I ordered were from different eras – the venetian red, and russet  was from their introduction in the 1950s, the Tuscan, and dual chrome band from the 1970s


Externally, the carriages have great presence.  The painting is crisp.  Details are everywhere.  Lots of pipework underneath, the ventilators are well executed, the end corridor connections actually move.  Some of the coaches have electrical pickup, which I thought was for internal lighting, however, it is a DCC connection to a 21 pin plug for external marker lamps
The carriages are designed to run on curves 24” (61cm) radius or above.  If your curves are tighter, Auscision have provided replacement kadee couplers with longer shanks to replace the couplers already installed.  A nice touch
I will allow the pictures to do the talking


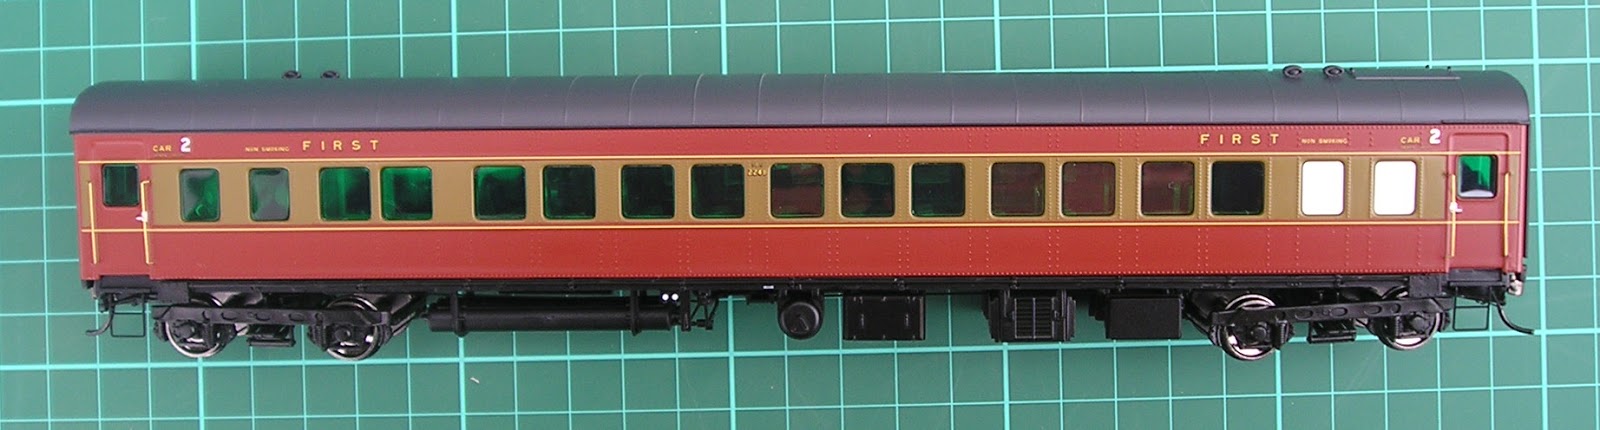
First class SBS RUB car – Venetian Red and russet. 
Something is not right.  The seating in these cars should be 2 + 1, and the saloon should seat 31 passengers.  What is provided is the 1960s rebuild which accommodates 42 passengers in the saloon areas.  The seats should also be green, but the tint colour of the windows makes the interior almost invisible.  What I also found interesting between the SBS cars in the 6 car box, and the 2 car box was the inclusion of the “non smoking” decal on the side of the SBS car in the 2 car box.  


Second class SFS RUB car – Venetian Red and Russet
Similar comments on the “non smoking” decal.  The seats are the same as in first class – whilst 42 passengers in the saloon is correct, the seats in 2nd class should be the lower, and harder roll-over type, rather than the swivel, and reclining first class. One of my models had a end step glued at an angle, so maybe a "friday" model?


Buffet/diner RS  -Venetian Red and Russet
The tinting makes it hard to see anything.  An add on plate “Sydney Daylight Express” is provided to add to the outside of the buffet car.


Power Van PHS.
With correct bogies.  My set number is 140 – which is assigned to the Sydney-Albury route – through Wagga.


First class SBS RUB car – Tuscan Red and 2 chrome bands.
With a clear window, one can really appreciate the detail on the inside.  Whilst the 2 + 1 seating was retained for the Intercapital Daylight, 2 + 2 seating in the models is correct for the other day trains.  Once again, we have the “non smoking” decal for the 2 car add-on box - although my picture of a real RUB car of this design says "No Smoking" (see my earlier RUB blog post for the picture).  Of extra interest is the change of bogies – the original with 2AN style with the later 2CA.  The interior is moulded in a colour that closely approximates the rich veneer of the prototype. The carriage position numbers are simulated "slip in" card style, rather than the permanent decal number of the earlier Venetian Red and Russett period.  Please note that the windows are clear, not cloudy as the picture unfortunately shows


Second class SFS RUB car – Tuscan Red and 2 chrome bands
Apart from the wrong seat style, the interior is crying out for passengers.  Externally, note the different bogie style,   no “second” or “economy” decals, and the “non smoking” decal only on the extra 2 car add-on set.  I am disappointed that Auscision did not provide “second” and “economy” decals for the purchaser to apply.


RS Buffet diner. Tuscan Red with 2 chrome bands 
WOW.  The interior is moulded in grey plastic, seats are correct, and some of the hotplates, and urns are molded-in ready to go.  Certainly this carriage needs to be superdetailed.  Food warmers, hostesses, detail painting, and hungry hordes  of passengers.  My memories of this car were the toasted ham and cheese sandwiches, and soft serve ice cream in a paper bucket with wooden paddle as the spoon.  Absolutely outstanding model


PHS Power Van
Set 146 is not an intercapital daylight set, but one had to choose from the available sets offered.  The number may be easy to rework.  I believe the marker lamps are operable

Summary

Unless you set out to model a specific train, it is difficult to get everything right.  Notwithstanding my negative comments on this quick review, I am thrilled that after a very long wait, the models have arrived.  For those wanting different RUB cars (such as the OFS) then I suspect that like the prototype, these cars can be kit bashed.   Please refer to Volume 2, of “Coaching Stock of the NSW Railways” for the variations.  Unfortunately, due to a lack of layout, I am unable to run these carriages at the moment.  I await to see a more informed review in the pages of AMRM: if they can devote 2 pages recently on a review of an obscure ballast plough kit, then no less than 10 pages of review will do these models justice.

Well done Auscision

Wednesday 15 May 2019

What's in a picture?


What’s in a picture

In my searches for photographs of trains in the Wagga area, I came across this gem, showing a truck being driven off a flatcar on the South Dock at Wagga.


The image that started my search.  Unsure who took the picture, but I am grateful that they did


What also spurred my interest, was the rake of CW 4 wheel cattle wagons in the background, on the mainline.  Was this part of a stock train, or a shuttle run to the Wagga stockyards, around 2km wast of  the station?   And what was the date of the picture?  I have in my accumulation of models, quite a number of 4 wheel cattle wagons, and if these were still being used around 1970, then this is good, as I probably already have enough for the layout.

My first thoughts to date the picture, was to find out when the number plate of the truck was issued.  A NSW plate, “FVB 822” is clear.   I know my father’s cars in the 1960s had number plates starting with ‘DOD’, and ‘EVL’, so an ‘FVB’ plate was probably issued in that decade too.  An internet search failed to find a date.  But I was barking up the wrong tree, as I was informed by a mate that truck number plates were issued separate from the car plates.

The truck is as far as I can determine, an International Harvestor, R190 series – and the grill looks similar to known internet images of the 1952 model. 

Sorbys is the company name on the truck.  An internet search on Sorbys came up with a long gone hardware store chain, that opened a branch in Wagga in 1954.  Sorbys sold later to BBC Hardware. 
So, from all of that, the date is at least sometime after 1954.

My attention now turns to the image of the cattle train.  I am specifically looking at the end closest  the Best Street bridge – either a brake van, or an engine.  It is not especially clear, but it looks like an X200 shunting tractor,  rather than a larger diesel, or steam loco.

Well, the first series X200 was introduced (or “kitbashed” from AD60 garratt bogies) in 1963.  I assume that one was allocated to Wagga shortly thereafter to replace a steam loco.  I found 2 images on the internet of the first series of X200 at Wagga.

ARHS image - dated 1965, shows X203 at Wagga's north dock

X203 in 1970. Note: a shunters truck was attached to the X203.


So that dates the photograph to sometime later than 1963. 

But is does answer one of my questions.  The X200 is shuttling the cattle wagons from the Wagga yard loop sidings, towards the Stockyards.  This fits in with my planned operation, where mainline trains, drop and pickup wagons from the Wagga yard, under control of the signalbox.  No mainline trains directly service the stockyards.  This will make the X200 shunter's task very busy, but I suspect, probably a most desirable operating position on any model layout.


My internet search had an unexpected bonus.  A series of pictures by Keith Waine of a Sorbys truck being loaded onto a pair of flat cars surfaced via google on Flickr.  The flat cars were being loaded at Coniston, near Wollongong.

The trailer was loaded onto the first flatcar at Coniston.  This area is now unrecognisable.


Chain tie downs for the rear of the trailer. The steel load on the trailer is also neatly stacked

Wooden chock detail


More chains

Chains and "A frame" support for the front of the trailer

Coniston Railway station used to have a "dock" on the down side of the platform, according to the way the shadows are falling.  
Finally the truck is secured on the second flatcar.

 These pictures have great detail, on the way the wheels of the trailer are chocked, chains, and the steel A frame support for the trailer hitch. 

Just before driving off the flatbed, the Sorbys truck on flatcar arrives at Wagga Wagga.  Note that the truck and trailer are now reversed from the orientation of their loading


The last of the pictures in the series shows the Sorbys truck at Wagga before being unloaded, so it links in perfectly with the original internet picture.  

The "at Wagga Wagga"  picture shows the station sign,  including the “Change Here for the Tumbarumba Line” graphic, an image that has,  to now,  proved elusive for me.  The Holden car in the background of that picture is I think a Holden HR, which dates the picture after 1966 - the year the HR was introduced.

But a mystery remains.  Were the roads so bad, that a truck needed to go by rail from the coast to Wagga?  The pair of flatcars has been split during their journey up from the coast.  And how did Sorbys unload the trailer off the flatcar?

So, from just one original picture, not only have I got a neat modelling project, but also an interesting “special load” for the operation.   Plus I have confimed that 4 wheel CWs were in use close to my nominal 1970 layout timeframe.  What I don’t have is a model of the 1st series X200 – but until one shows up, the IDR X200 (second series) is an excellent stand in.


To all those attending the "Modelling the Railways of NSW" seminar at Loftus this weekend, drive safely, and get inspired.  It is a bit far for me to attend.

Happy modelling.


Saturday 4 May 2019

Backscene for Shepherds Siding


Backscenes
It may be a while off yet,  but backdrops are a necessary part of the planning process, and the time to think about this is before track goes down.

Shepherds Siding Silo.  The backscene image needs to be positioned so it looks right from normal viewing heights, as this prototype image shows.  A grouping of small bushes helps disguise the join between baseboard and backscene. 


Way back (over 20 years ago), I was responsible for initiating construction of a club exhibition layout, which became known as  12th Street Yard.  The premise of this layout was 2 fold – mainline running, with switching in an urban environment.  To say this layout was a resounding success was testament to the enthusiasm from the ACT Model Railway Society members, who built, displayed and ran it on the exhibition scene for over a decade.  For me, the layout was a major step up in quality, and a steep learning curve that has influenced my later modelling
We made mistakes too – one of them was the initial lack of a backscene.  But I think the below pictures (taken by Ralph Cooke for Continental Modeller July 2005) will give a hint how important a backscene is to giving a layout real atmosphere.

Without backscene, the buildings at the back indicate the limit of the world,  600mm from the front of the layout.

The backscene now has images of Chicago (although it could be anywhere USA), and far enough in the distance, to add some credence to positioning the layout 12 blocks away from the downtown area.  The view also hints that the layout is elevated on a hill 
Disguising a street was probably the hardest problem we faced

The inclusion of a suitable scene made a huge difference. This street image from  the Morning sun book "Street car scenes of the 1950s" was image reversed to compliment the foreground.  You would need to look closely to see the reversed number on the streetcar, billboard and the wrong direction of the cars. The drop away of "Liberty Avenue" disappearing to the horizon was consistent with the other backscene images we used 


Whilst many of the backscene photos for 12SY were scanned out of books, I am lucky that I can take my own pictures for Wagga.  As a shelf layout, the backscene is the major trick to widen the visual appeal of the modelled area.
The first area selected is the farming area between Bomen and Shepherds Siding.  I expect that I will have about 3 to 4 metres of backscene.    So armed with a camera, choosing a particularly nice day, I went out to take a series of overlapping pictures of farmland typical of the area.    At Harefield, (not quite at Shepherds Siding, but close), I was able to take 12 overlapping pictures from one location. I did this handheld, but a tripod would have helped.


Back home, I loaded 4 pictures into Adobe Photoshop, and ran the “Photomerge Panorama” command with 4 of the images.  The result on screen was amazing.   The original resolution has been maintained across all 4 images – the .jpg file size is 24.7 meg


4 of the above images Photomerged to a panorama.  Apart from a fencepost in the front RHS, there is nothing in the image to distract the eye

That is where I am up to thus far.  I still am experimenting with the software.   Of course, the proof of the pudding is in the eating – and unlike 12th Street Yard where we were able to use a bubblejet printer, printing a long panorama takes special handling.  I am aware that I could send the image over to the Backdrop Warehouse in the USA for printing, although the cost factor is high.  An Australian company may be better. Dropz Backdrops doesn’t specialize in model railway applications, but will print your images on vinyl, and prices appear reasonable.  I recently was advised that Office Works can print a 24” x 48” (approx 600 x 1200mm) poster from your  digital image for around $60.  So assuming that I can layer two panorama images on the one digital image (each panorama to be 12” x 48”), combined that would give 2.5 metres of backscene.  
Before too long, I am going to have to do a small scale  test print (say 50%), to limit my losses if things go astray.   But, assuming it works,  a photographic backscene could be the way I will proceed for the whole layout.

If you do nothing else today, challenge yourself to try new things.  Until next time