Thursday 17 February 2022

Wagga Wagga station - painting the awnings

 Awning Painting for the Wagga station

The secret to successful painting, is subassemblies.

XPT in 2006 at the Wagga station  Steel train on the mainline


During the build of Wagga Station, I spent a lot of time considering how I would go about painting the model.  Whilst the main red colour was sprayed, the masonry decorations were brush painted.  This work had to happen before the awnings were added.

With a kit, one could trust the kit manufacturer to have all the dimensions correct, and things such as awnings and verandas could be treated as a subassembly, and prepainted prior to final fitting.  But, my Wagga station, all the parts had to be cut and shaped to fit.  So a lot of thought was put into designing a method where the parts could be disassembled after fitting for painting, and perhaps lighting down the track


The main station awning was connected to the station with 6 screws, accessed after removing the station roof

Underside of the awning, showing the wooden frame


It may not be seen on the model, (unless the viewer is really keen on simulatng a passenger eye view of an approaching train) but the corrugated iron on the real station is just secured to a wooden frame. I have tried to simulate this with evergreen strips.  These cannot be full depth, as the corrugated styrene is thicker than prototype - a compromise that has to be made.


The evergreen strips on the underside were painted Tamiya red-brown, after the awning underside had been sprayed silver (Tamiya aluminium)

Once the awning had been removed, the etched brass support can be unclipped from the platform base.  After cleaning, I placed this in a pickling bath of vinegar.  The bath was previously made for the Murrumbidgee bridge lattices over 4 years ago.  Good to find another use for it


The front awnings were similarly disassembled.  Here they are after the etches were spray painted, and the roof sprayed silver, and hand painted with the same Taubmans sample pot paint colour used for the spraying. 

After reassembly


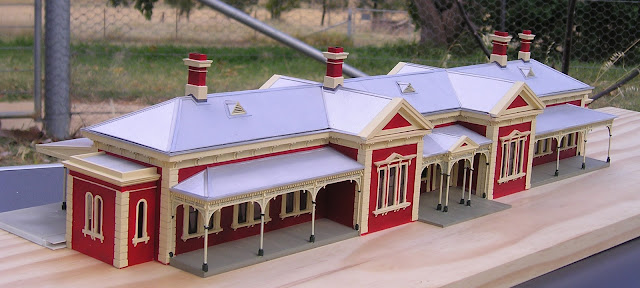
The main platform ended up a lot lighter than I had originally hoped, but the lighter grey doesn't detract, and reflects light better into the shadows.  It can be resprayed if people don't like it.  And after the silver paint dried on the main platform awning, there were some visible variations in the paint coverage. A second coat may have fixed it.  An alternative, which may be better was to try a subtle powdering weathering technique that simulates some age.  It is a technique that may be applied to the main roof later 

Next stage.

Still have the downpipes, and other small detailing, but Bob, in a comment last blog, asked if I would be making the two other buildings on the platform.  These are the Gents toilet block, and the former Parcels store.

So, here is a hint for a future blog post.

Roadside view - showing all 3 structures that make up the full station.  The Gents toilet block is on the left, and the parcels storage building on the right.  Both these are in the process of being made.


Until next time


Monday 7 February 2022

Platform awning

 Wagga Wagga station - platform awning part 2.

The last major part of the main Wagga station building remaining was the platform awning.

Before the heritage rework and painting of the station, 3801 was doing the honours on a tour train on a wet day 

In 2020, I had measured, and photographed the platform awning


This last image shows the orientation for the end of the platform awning, and the iron work


I provided those measurements and pictures to Ross Balderson, who had earlier offered to draw them up in Corel draw.  In February last year, Ross asked that I bring the partially constructed station to an NMRA meeting over in Canberra, where he could test the drawing against the model.  Most worked out, except for the dimension across the gable walls on the platform.  It turned out that I had mismeasured by 2mm.  The 2mm compounded out to almost 1cm across the entire platform length.  Fixing this in Corel was straight forward.  Ross then used his connections, and after a process taking about 6 months, the etches arrived.


It was with some tripidation to find out if the platform etches actually fitted.  Ross had designed the etch to be joined in 2 places to get the full width - which worked well.

Placing the etches on the platform to check what modification was needed.

To my absolute relief, the fit was near perfect.  Parts aligned correctly.  The only modification was a small extra length on the ends of the long etch - and this was there just in case.

Perhaps I am being dramatic, but knowing how many measurement compromises, and scale reductions I had done to make the main station, having the etches fit was a minor miracle. 

Assembled into the frame. 

Ross had etched the brackets, but not the extension on top of the bracket. (see the prototype picture above)  This was my fault in not providing Ross with that information.  Not a big issue, I found a 1mm square brass rod in my stash, and soldered it to the bracket.  It will be trimmed shortly.  Repeat for all 12 brackets

Modified brackets soldered to the main etch with low melt (144C) solder.  (Flash photography shows a shadow)


To add some strength, as well as providing an edge for the later styrene, an "L" shaped brass shape was soldered to the bracket extensions again with low-melt (144C) solder

To locate the pole bases, the etched brass "pins" were positioned over the styrene pole bases, made earlier

Posts added to the fret, again with low melt solder.  Note the styrene posts on the station walls - in roughly the same location as the prototype picture (above)

I used a post-it note template to check the awning end, as well as a pattern for the styrene.


The awning is made from styrene.  The wall support spaced with 0.080 spacers, and will be held in place with bluetac, whilst small screws are fitted to enable later removal.  The styrene resting on the brass bracket already has the guttering.

The first section of corrugated styrene cut and fitted.  


Awaiting painting. 
A steel train passed Wagga in 2016.  Picture taken from the footbridge.  Very close to the angle with my model picture.


A couple of extra shots of my model, better showing the roadside view

I am tickled pink to get to this point. all the major construction is now compete. 

Next stage of the station build is the painting.  I have already made a start, but I will leave that for my next blogpost.

Stay safe, and build a model or two.

Until next time