An
update on the train room
Last week,
I am pleased to announce that the last major piece of my Train room was
installed, 40 metres away from the room.
Before I bought my house in 2014, I noticed that there
were holes in the concrete slab at the back of the large brick garage. I assumed that these were to serve a small
bathroom, as there was also a partially built brick wall to enclose the
facility.
In 2017, the holes were investigated, and we found that the holes were indeed plumbing, which unfortunately didn’t extend past the end of the concrete slab. So, before landscaping and new paths were installed in the backyard, pipework was extended from the slab, down the slope, and terminated in my horse paddock.
 |
| Stormwater, and septic pipes share the same trench down the slope from my garage. |
And
there is remained until last week. Cameron,
my plumber for the train room, wrote up the request paperwork for a septic
installation to go to Council, and approval came shortly later, with a few changes
Septic
installation in pictures
 |
| Finding the end of the septic pipes required some deft work of Dave, with his digger. Fortunately located exactly where we left it |
 |
| Dave digging out the hole |
 |
| The hole had to be 2 metres deep, 2 metres wide, and at least 2 metres long. Fortunately, no rocks encountered, just clay. |
 |
| Some idea of the depth with a ladder |
 |
| The rubble pit beyond being dug. |
 |
| End of the pipe in the rubblepit comes up to a small access point. The pipe was then covered with a cloth, and then buried in sand |
 |
| Some pipes being used as future anchors to stop a tank from popping up if the soil gets waterlogged |
 |
| Dave pulling back the dirt, to cover the rubble pit |
 |
| Once the grass grows back, just the access points will be visible |
Sink,
and Hot water installation
 |
| Cameron installed the sink, and cut the awkward angles to connect the outlet pipe to the pipework previously installed. Truely skilled |
 |
| More careful cutting of pipes, this time the copper lines to the hot water system. |
Having a
comfortable room
An ensuite
and kitchenette may seem like a luxury, that is not needed for a train
room. I don’t think so. A comfortable environment for construction of
the layout, and later, for the enjoyment of an operating crew will pay
dividends. And, not having a parade of
modellers tramping through the house will maintain harmony with others (and
pets) that are not interested in the train operation sessions. I have been blessed in experiencing some
excellent “Crew Lounges” over the years, and whilst a full lounge is not my
plan, I may later be able to expand into the rest of the garage….just don’t
tell the Boss
 |
| I visited Bill's layout down in Victoria last year. His crew lounge is well appointed, with a kitchenette, TV, loungechairs, table, plus trains, and pictures to view. |
Planning
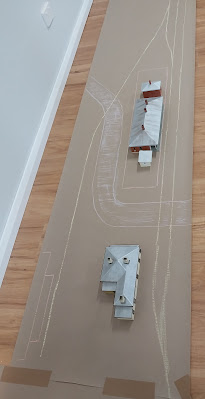
1:1 scale.
As the rest
of the train room is still awaiting final completion, I am continuing with my brown
paper, and chalk drawing full scale on the floor. Making use of my existing structures gives
some life to the plan, and also aids in the determination of clearances. And chalk can be erased, and reapplied.
 |
| There is plenty of space behind the buildings - possibly too much, so this is an area which can be squashed. |
 |
| After removal of the structures, the brown paper can be rolled up. |
My original
idea was that Bomen would be mirror imaged, and the station master residence be
sited close to the station However,
having both the buildings close to each other gave problems. It impacted the size of the Bomen yard
tracks, and the Station Master residence (SMR) looked visually much bigger than it
should. I haven’t measured the SMR, but
I now think the Walker Kit is overscale.
Placing the SMR the other side of the level crossing breaks up the visual
comparison, and gives more length to the yard loop track. I also note that 600mm wide paper is a lot
wider than it needs to be, and this will be made thinner once the staging yard baseboards
are chalked out.
Final
thoughts
The Septic
installation was the last major expense for the train room. Whilst the ensuite is still a way off
finishing, layout construction can start
as soon as the skirting, & trim is nailed to the wall, and nail holes filled & painted Hopefully soon.
Until next
time, build a model or two.

.JPG)


