Wagga Wagga station building - painting begins
Almost everything that I attempt in this hobby takes longer than I initially imagined. Such is the case with the Wagga station. At the end of the last blog, I thought I would be well advanced on the painting within 2 weeks, but my actual progress has fallen well behind that ideal.
 |
| Wagga Wagga station in 1990. I had forgotten that the hertitage red and cream had been applied to the station prior to the reconfiguration, and removal of the ugly rear offices. One of the delays in the model painting was caused by me searching, and scanning some of my slides. |
The first activity was fabrication of the two toilet wing extensions. These would be my template for testing out my paint colours, and technique. Both extensions are very similar.
 |
| Repeat for the other end. The 3 sides of each toilet extension are identical. |
 |
| 3 sides assembled into a box, with a corrugated styrene roof |
 |
| The gutter on the toilet blocks is hidden behind the walls. Note the extra thickness of the walls as viewed from above. |
 |
| Staff end toilet block in position, after detailing finished. 117 pieces of styrene used for each. |
 |
| Ladies Waiting room toilets. I noted that the railways' plans I had been using only had a single larger window for the end, where the station was actually built with a pair of narrower windows. |
Adding paint
My paint of choice for spray painting plastics is acrylic - namely Tamiya. However, I don't trust myself with mixing colours consistently. I have had some success in the past with Taubman's sample pots, and a trip to Bunnings co-incided with other activities in Wagga. I selected "Streetwise" to be a close match for the dark red, and "Bamboo Cane" was close to the cream. Cost was around $4.50 per 250ml pot - a bargain, although you would be unlikely to get close to using it all.
Sample pot paints tend to be a lot thicker than hobby paints, but can be thinned successfully with Tamiya thinners for spraying, or brush painting.
Step 1, was to clean the plastic with detergent, and then metho with a cotton bud. Allow to dry
 |
| Ladies Toilet block extension |
Step 2. Spray the red, and leave it for a day to dry.
Step 3. Break out the brushes. First paint the roof ( Tamiya Aluminium ), and very carefully brush the cream colour around the windows.
Step 4. Paint the roof trim.
Step 5. Finally paint the blockwork on the corners.
Handling the model is normally with the corners - so keeping paint clear of that area should hopefully prevent cream coloured fingers from spoiling the red.
What I have found? The red colour bleeds into the cream. This could be not allowing the red to fully cure (impatience on my part). The cream also needs more than one coat. The streetwise red didn't dry quite as dark as the Taubman's colour chart had shown - but it isn't too far off. Maybe a second coat would help? Painting the trim is at best fiddly, and very time consuming. Plus it is for me impossible to paint the edges of the 0.020 thickness of the trim to get a sharp line with the wall. Had the windows been assembled independent of the station walls, then they could have been painted prior to insertion. With 3D printing, this should be possible (note for self). Masking is an option, but the curves of the arches would make this extremely time consuming.
 |
| Colour changes in shadows and different lighting. Both toilet blocks are placed into the correct location, but not glued. |
At least the station roof is removeable for painting.
An ebay win
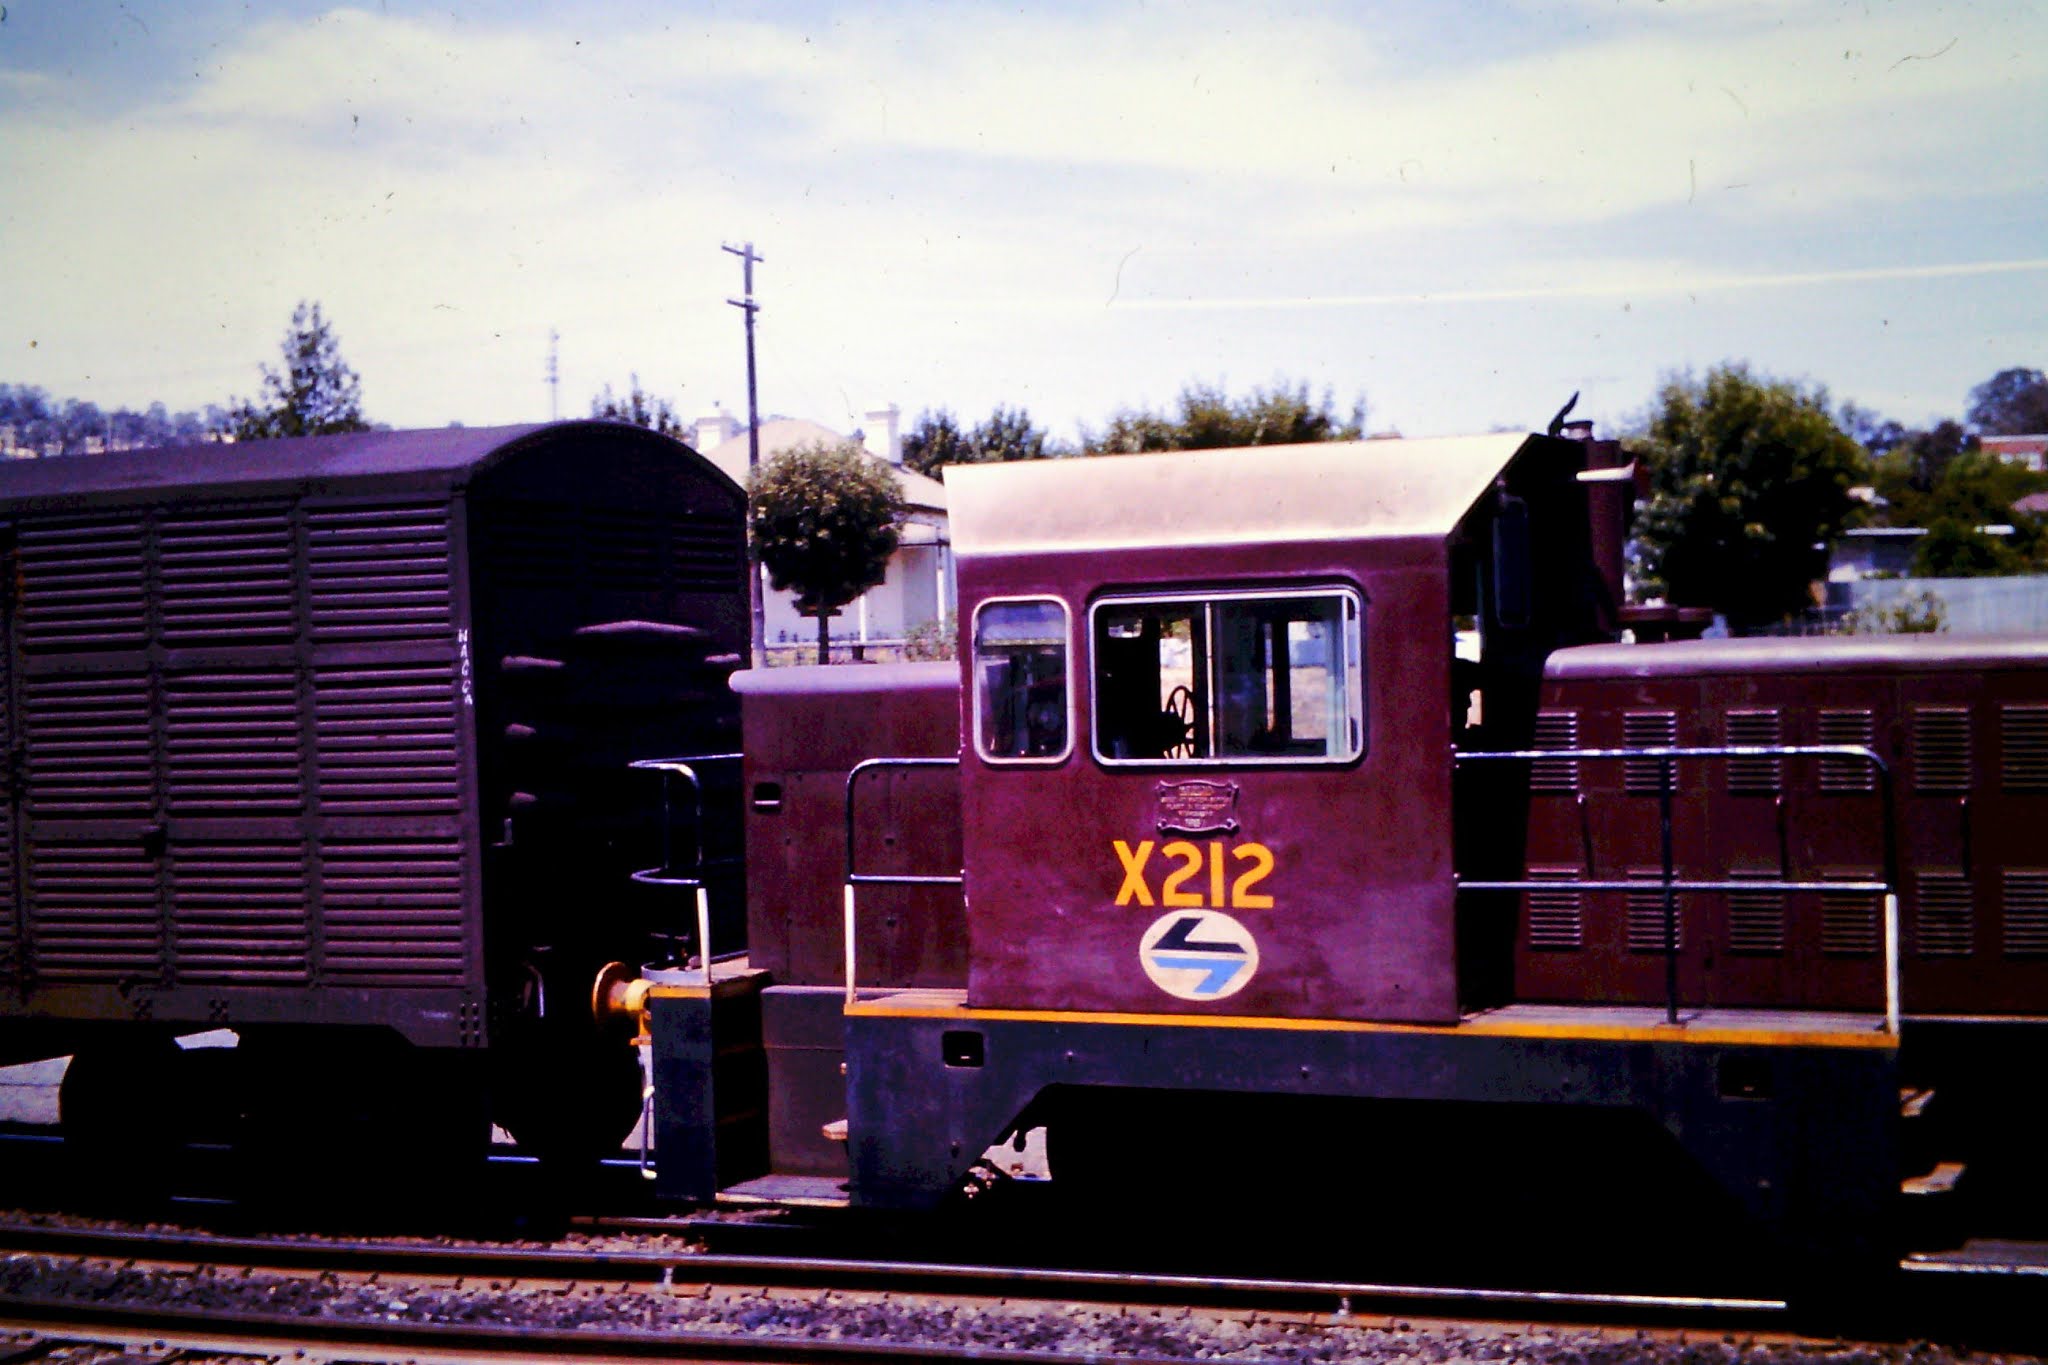
The X212 shunting tractor was the captive shunting engine at Wagga during the 1980s when I had access to a camera and a car. So it was, and remains a firm favourite.
A long while ago in the 1990s, Bergs Hobbies announced a whitemetal and brass X200 kit, and I bought one, and of course, it had to be X212. I was quite proud of my little loco - fitted the siderods, glazed, fabricated the decals. It used the Tenshodo spud drive - so was probably a bit quick - but the extra weight made it very powerful.
 |
| Bergs X212 - a little dusty. |
A few years back, IDR announce the X200 tractor as their first RTR model. Of course, I needed one - but knowing I had X212, I bought X207 - another Wagga engine.
Last month, A seller on ebay listed a used IDR X212, fitted with DCC and keep-alive. Price was a lot less than my original X207 purchase, and even less than the current reduced IDR RRP I couldn't help myself. After a short bidding war, I secured the model.
 |
| IDR X212. Handrails are a bit flimsy for handling, and they probably need to be part painted black, but the loco is nice |
The model performed well on my test track. As people might know, I presently don't have a layout, but I am going to Yass this weekend for an operating session on Kangaroo Valley layout, where I have been given permission to run my X212.
Southern Aurora visit
A sign of reducing Covid restrictons - a tour train visited Junee yesterday (March 11, 2021) 4204, and 42103 hauling 15 coach Southern Aurora set. Rain held off for me to capture these images. The southern aurora is a train that will be making an appearance on my Wagga layout - Auscsion 10 car set.


 |
| Way back in 1982, I photographed 4204 in Canberra - its last revenue run for the NSW railways. It is great to see the loco looking brand new after extensive restoration and overhaul |


 |
| After arriving at Junee, the pair of locos ran around the train. The tour was heading out onto the branchline towards Griffith. |
 |
| Classic Bulldog nose diesels. Not a lot of people like the former "candy"livery of 42103. It is great to be still able to experience some classic trains from the past |
A final shot from the camera of Pete Neve shows the train on the branch - nearing the former station of Rock View.
 |
| Approaching Rock View - picture by Pete Neve March 11, 2021 |
Until next time.