Friday 2 December 2022

Wagga Wagga station - some more detailing

 Detailing on Wagga Wagga station - continues

Detailing is something that takes ages, but is necessary to complete a wagon, loco, or structure.  With a modern kit,  most of the detailing is included.  Some of the older "craftsman kits" rely on the skill of the modelmaker.  Scratchbuilding, may give an opportunity to purchase parts to suit.    I may have taken on a bit more, as modelling an iconic structure, means that many of the details have to be fabricated from raw material.

The Tumbarumba bound railmotor awaits departure from Wagga station, around 10am.  This picture taken on the Wagga station diorama with real sunlight, and shows some of the detailing applied recently

Fly Screens on Parcel Office windows
Out-of, Parcel Office, or Museum building


Ultra fine mesh cloth was coloured with permanent felt tip whiteboard pen.

The window frames and bars were made from styrene strip directly onto clear plastic

Check for fit..
More Parcel Office details

More details made.  I had taken some close-ups of the the two air conditioners to try and get them right.


Doors and downpipes

Platform and platform road


I cut a number of strips from the Staters Brickwork sheet I had left over from the Bomen station build.  The Wagga platform face is straight, and not reverse stepped like most NSW platforms.  This makes the Wagga platform easier than otherwise - probably the only win to save time in the entre build. 

The track in front of the station will be added when needed for the diorama.  This is so that when fitting the station on the layout, I won't have the problem with track, if I need to later remove just the station.  Thinking ahead?   Masking tape used to contain the ballast on the strip of wood used for the track. 

Ballasting done in the normal way - with the masking tape to prevent unwanted spillages.  The bubblewrap was just in case the glue ran onto the support table.

Wagga station in the late afternoon, picture taken from the footbridge (shadow)


Parcel Office from the platform.  The blue luggage carts are courtesy of Ross Balderson, as he included these as a space filler on the etched brass fret for the Wagga station verandas.  The platform face was attached to the wood base of the station with spray adhesive, and weathered with Tamiya Smoke, but could be weathered further.  The platform road is just placed in position

The parcel office from the roadside.  The downpipe on the main station toilet extension is visible

The main toilet block has an unusual window style.  I had assumed the horizontal "bars" were shutters, but closer inspection, the bars are actually metal bars, with a wooden blind behind.

Both roadside, and platform side windows made from strip and rod styrene on 0.020 styrene sheet, backed onto clear styrene "glass".  I won't kid you, these took ages to make, 

The bars are difficult to see in this platform side angle (the roadside image at the front of the blogpost, shows them better) Platform brickwork not yet weathered

Westedge 3D figures, (reviewed in AMRM Dec 2022).  I am always looking to save some time, and preprinted in colour figures may enhance the diorama.  Unfortunately, the glinting on the clothing is distracting, but I hope that Dullcoat will fix this.


At what point do I stop this process?  A lot of years have passed since I was given some advice.  "Twelfth Street Yard", the American layout for the ACT Model Railway Society had been on the exhibition scene for about 5 years, yet I continued to champion adding more and more details, as my thinking at the time, was that the viewing public needed to be rewarded the closer they looked.  Then, my view was countered.  The person said that '12th Street' was already detailed enough, and I would be better spending effort on a new layout.  And they were correct.  The ACT model railway society had 2 other layouts, and I moved towards detailing, and improving "Little Austria", a module HOe layout.  "Yendys" was at that stage, started, but not actively being worked on.

I am close to reaching the sufficient "detailing" for Wagga station.  Yes, there are a few more downpipes to add, small signs to make, lamps, and positioning seats, litter bins, & passengers.  I know there is more that could be done, like a waiting room interior.  However, to continue with Wagga would delay other projects that I am itching to progress and share...


-----

Times are changing.  It is important to record now, what might change tomorrow.  Some examples

Edmonston Street Bridge


I took these pictures in September (and this bridge was the subject of an earlier blog-post)


These two pictures taken last Tuesday (Nov 29, 2022), showing the collapsed retaining wall, due to the heavy rain Wagga received in November.  Unsure if this will be repaired, as the bridge has to be removed for Inland Rail in 2024? - and it may be possible for this replacement bridge to be advanced


Harefield Shuttle

One of the regular trains that I watched (and listened too) was the Visy Harefield shuttle.  Their normal motive power was vintage Goodwin Alco engines - and the burble from their engines was quite distinctive from the GM,  GE, and chinese built locos.

Well, Visy relocated their intermodal operation from Harefield to Bomen's new intermodel facility on Nov 24, 2022.  This reduces the round trip truck haulage from the Visy factory in Tumut by about 30km, and allows Visy to run heavier trucks.  The Bomen operation also means that complete trains can now run direct to and from Bomen, and the breakup of trains at Junee for the shorter Harefield siding is also not required.  The Alcos are still running light from Junee, to Bomen, as they are needed with shunting at Bomen.  

I failed to take enough pictures, but there are u-tube videos of the shuttle in its heyday.

In 2018, the shuttle departs Harefield (silo in background) in the gloom of the  late afternoon.  Alco smoke a feature.  As a passenger in the car, I wasn't able to stop.


Finally

If I don't write another blog post in the meantime, may you all be safe for the upcoming Holiday period, and hope that you are able to get some quality time.  

Saturday 5 November 2022

Bomen Signal box interlocking


Bomen Signal box Interlocking - or - who is going cranky

When I was designing the future Wagga layout, I had anticipated incorporating my partially built 56 lever frame only for the Wagga station.  The station at Bomen though didn’t seem that important in the scheme of things, and I was not going to worry about this until the layout was constructed.

As it turns out, I have not as-yet been successful in finding a builder, who is willing to undertake construction of my train room.  So, projects that were on the back burner have advanced instead.

My picture of Bomen was after the signal box removal in 1983


Prototype Bomen

Bomen was a crossing loop, with some additional sidings.  Only the sidings for the meatworks stock yards were interlocked by the frame, the long siding into the meatworks, the siding into the canning factory, and the one for the leather works were on a simple ground throwover levers on the yard tracks 

Bomen’s signalbox according to Bob Taafe’s signalbox book, was relocated from Uranquinty around 1941.  It was situated on the southern side of the station.  The frame was 20 levers.

A picture from the internet - showing the signal box

After I had enlarged a small pixel image of the signal diagram which was used for the interlocking diagram, a far better resoluton image showed up.  Careful checking found an error - lever 10 was actually a catchpoint with signal attached, where Bomen frame as modelled, as this lever as a signal, with a catchpoint attached.  Shouldn't affect operation


Modelling.

Way back in 1982/3, the British magazine “Model Railway Constructor” ran a comprehensive monthly series authored by Martin Goodall, on constructing a layout based on the GWR station of Bodmin.   Parts 15 through 23 concentrated on signals, and interlocking.  Inspirational, as well as informative.  The parts dealing with mechanical interlocking were the best I have ever seen on the subject, and from the time I read the article,  I took an intense interest in this obscure aspect of modelling.

(copies of the articles are at the end of this blogpost)

Unfortunately, this interest started just after the NSW railways removed the signalboxes at Wagga, and Bomen in 1983. 

But, luck was on my side.  A fellow modeller, who had also seen the MRC articles, had actually started making interlocking machines in approx. 1/10 scale, using the principles of the MRC articles.  Then around 1990, the Defence department moved him to Queanbeyan, where I was living, and I got to know Tony.  Tony Kociuba’s layout Manuka, was featured in AMRM way back in issue 188 (October 1994).   I got to work a fully interlocked lever frame at his home, and at exhibitions.  After a while, Tony trusted me to build a large lever frame under instruction and guidance, that being the 56 lever frame of Wagga Wagga .

The Wagga signalbox frame was built by me in the 1990s - still needing to be interlocked.


Since moving to Junee, Tony and myself have maintained a sporadic contact.  When Tony found out about my plans for the layout, he volunteered to construct Bomen’s frame as a contract build for his Mackenzie in HOLland hobby business.  I supplied Tony with as much information I had at the time  unfortunately, with the lousy small pixel signal diagram picture.  It was also a bit of a fiddle, as my rendition of Bomen’s track plan is mirror image of the original.    Tony now lives in Bendigo, and detoured into NSW via Junee to show me progress, and later the finished lever frame – fully interlocked.


Tony made 2 visits - the first one showed me the progress of the frame, prior to interlocking


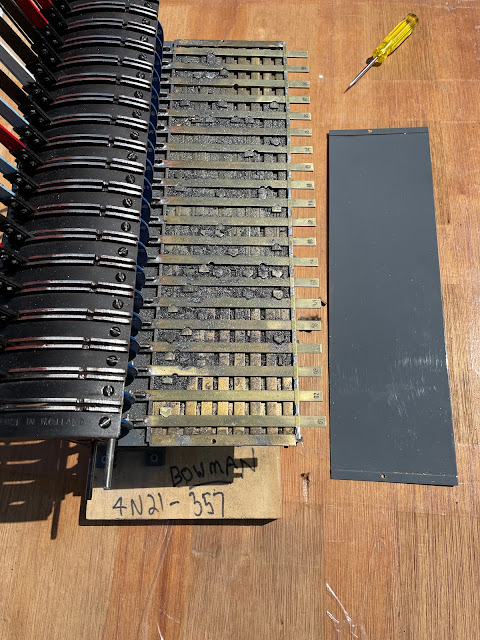
On the second visit, the frame had been finished.  Here is the interlocking with the cover removed.  Note that all the tappets have numbers, which helps if the frame ever gets disassembled . Tony adds a lot of graphite for lubrication 


Now I have to learn the frame, and crunch the levers in the correct order to free up the mechanism   Excess force will break something, so you don't want to pull the levers in the incorrect order.  It will be a challenge for the future Bomen operator too, but learning the frame was part of the real signalman's job - and simulating this on a model takes things to another level of realism

.

Albury to Junee.  The levers have to be pulled in the pull chart order as seen on the signal box diagram.  

Albury to Platform road

Junee to Albury


Integration into the layout will be via electrical connections, rather than through a mechanical links direct off the levers

Signals will of course have to be built.


Trouble cat - gives an idea of how big the lever frame is.  She may not yet be the station cat, but takes a lot of interest in what I am doing


Observation.  A lot of older magazines contain a wealth of information.  Some of these publications get converted to a digital format, but a few never do.  It saddens me to see the wisdom of these now forgotten publications, consigned to landfill, or recycling.  Please, consider the process that brought the articles contained within to print.  The author, the editor and their desire to not only sell magazines, but the sharing of knowledge.  We are all better modellers by learning from their experience