An
exercise in Black magic. Corel Draw
If I
thought that finishing the styrene construction of the main Wagga Wagga Station
was the end of the difficult part, I was kidding myself. The station veranda, and platform awnings
have added another degree of complexity.
 |
| Wagga Wagga station - east end roadside veranda in 2019. Just look at all that lacy ironwork |
As I have
stated earlier, I needed to improve my styrene scratchbuilding techniques
before I embarked on the Wagga station model.
So, I started with less ambitious projects – the kit bash of the
Tumbarumba Station, the lamproom/toilet block for Ladysmith, the Wagga Wagga signal
box, and the Bomen station. Apart from
the lever frames in the signal box, everything could be made from basic styrene
strips, and sheets. And the projects
were of steadily increasing complexity
The Wagga Wagga
station is a continuation of this increasing complexity , although the
Victorian era ironwork would be a challenge, as styrene shapes would not be
able to be used
Either I
build the station without the ironwork, or try and find an alternative.
A model
Railway hobby is best shared
Fortunately,
in my NMRA group I have access to the experience of Ross Balderson. Ross needs no introduction from me, his modelling skills
speaks for itself. In 2018, I explained my
problems over the Wagga Wagga station to Ross – asking his advice on using my copy of
Corel Draw (I am a novice with this software)
My thoughts were that one could
import images into Corel, and those images could then be manipulated, and the
results printed onto clear acetate, and cut to fit.
Anyway,
Ross dismissed that idea, and said the best option would be to actually draw
the patterns into corel, and then get them etched. And, then he offered to not only do the
drawing for me, but arrange to get them etched.
I could not
believe my luck. I readily accepted.
Slow and
steady.
There was
no point in arranging the etches early.
The Wagga Wagga station was still well in the future. I suppose, that it took another 2 years from
Ross's generous offer, before I enough of the Wagga station constructed so that
the basic dimensions could be measured.
Ross, true
to his word, asked for detail photos, as well as dimensions of the model, and
prototype.
 |
| The Eastern roadside veranda. The pole details can be seen, as is the ironwork, and decoration on the woodwork above the ironwork |
Armed with
tape measure and camera, I developed this plan.
 |
| A bit confusing, as it shows measurements from my model, as well as some real dimensions of some features. |
I emailed the plan, with a lot of detail pictures to Ross. Ross then beavered away on Corel, and then emailed me back small etch mask for me to check dimensions
 |
| Artwork from Ross. He had drawn extra side ends, but that was easily corrected. Note that Ross had added a fold line - that not only matches the protype, adds strength, and a 3 dimensional effect. Ross's experience shines through. |
I printed the drawing, and it was extremely close.
Armed with
this knowledge, Ross continued with the rest of the artwork/drawing
At the next
NMRA meeting (beginning of 2021 - Covid restrictions were not that bad for an outside meeting at a home environment), I brought the Wagga station with me, and all the parts of the
drawing were checked with the actual model of my station. We picked up one error, and it was mine. The 23.2 cm dimension on my plan was out by 2mm – should
have been 23cm exactly. That error,
although small, was enough to throw out the platform awning. Fortunately, the error was easily corrected with
Corel Draw.
Ross then
populated the future etch with items for his N scale Newcastle layout, and some
HO detail items for me. The price of
the etching process is based on the size of the sheet, not what is on it.
Across
the planet.
I am
indebted to Ross’s contact, Phil Badger – BadgerBits. Phil uses a UK based etching company. I knew the process could not be rushed, I had
more than enough to continue with in the interim. It was late in September, when Ross informed
me that he had the etch back, and was removing his items. The postal service was quick, and I had the
etch a few days later.
 |
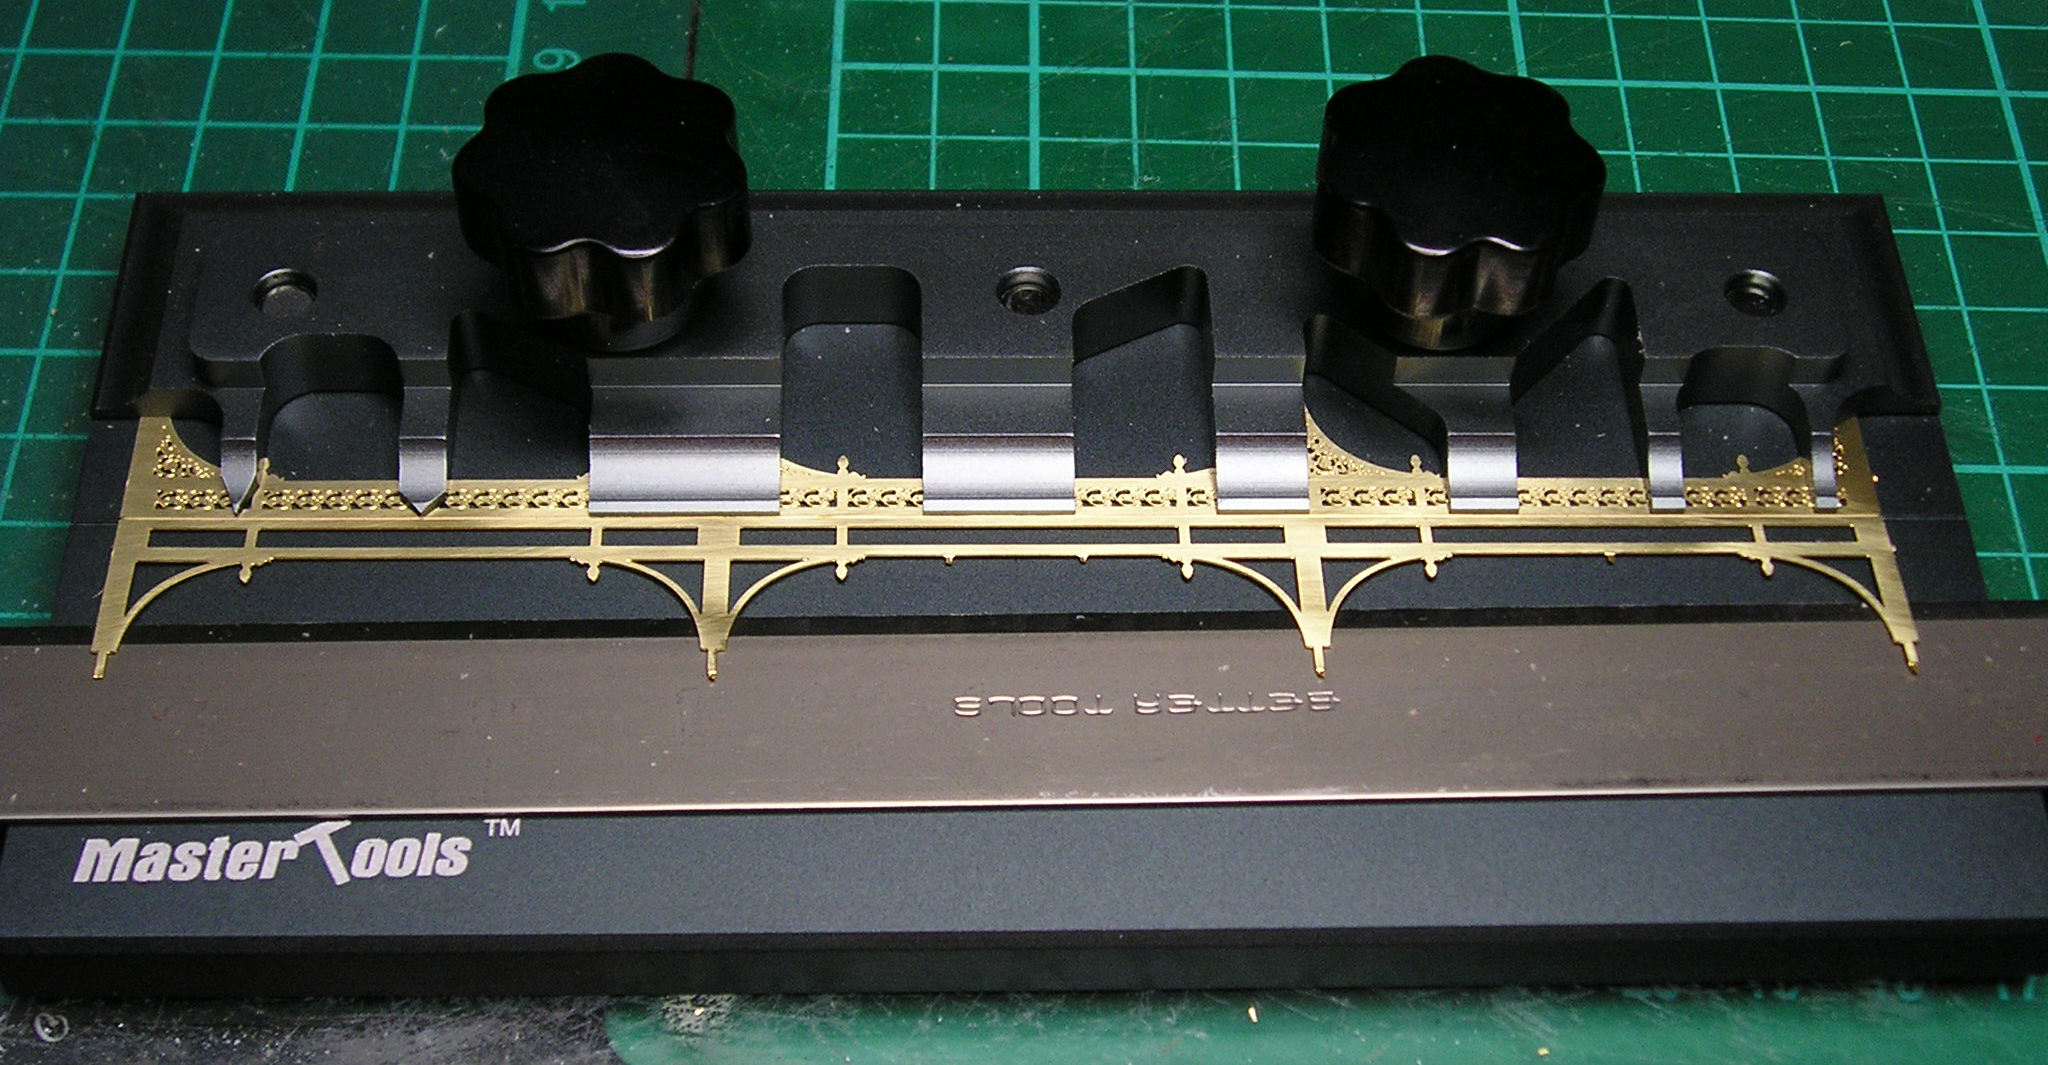
| My picture does not do the etch justice. It is gorgeous. Approx A4 size. Ross had previously snipped off the N scale items he needed, although he left me with a few bonus goodies, like a platform trolley, and multiple sets of workbench tools |
Starting the construction
First step was to measure the etches against the station. Spot on. There is some brass material to be removed from the end of the etch to make it fit snuggly against the wall, but nothing that the Dremel could not handle.
I removed the first etch, polished/cleaned the brass with a track rubber (the only thing track rubbers are good for), and then folded it over

 |
| My long etch bending tool - the first time used. |
 |
| The fret on the tool. The large grey object is like a ruler, but has a very sharp knife edge to lift the etch |
 |
| After folding - the etch rests on the styrene floor that I make in the next step. Note that I have filed notches for the wall blockwork. |
After
folding, I lightly sweat soldered the sides together
The sloping
floor for the veranda is made out of styrene.
The floor is hollow. The floor
was then trimmed to accommodate the wall blockwork.
 |
| 2 halves of the floor. The spacers are 0.080square, and 0.080x0.100 thou styrene strip. The slope is cut from 0.040 styrene. The top and bottom is also 0.040 sheet styrene |
The poles
were made from brass, with a styrene base
 |
| Some of the raw material for the poles. I didn't buy these especially for the project - I had them "in stock". |
 |
| A how-to guide flowchart on the poles. The first one took me well over an hour to make, the third one about 20 minutes. There are 21 poles on the Wagga station |
NB The
poles, or columns should be tapered, and fluted – this was a step too far. The 1/16” diameter of the brass tube is very close to scale at half way up the actual pole For completeness, the actual pole has a 40cm
circumference at the top (approx. 12.5cm diameter), and 49cm (15.4cm) at the
bottom of the fluted section. The octagonal base is 83cm circumference
Proof of
the Pudding is in the eating
Locating
the etch on the floor gave the locations for the poles. Thus marked, I then reamed out the hole in
the pole base styrene, as the floor was sloping slightly, and I didn’t need a
solid fit for the poles as that would have them at angle.
I then loose
assembled the etch, and poles onto the floor – then checked how things looked
with a camera. Well, my measurements
were correct – the bottom of the etch brackets extended to the same height as the number of wall edge
blockwork on the prototype.


 |
| Held in place by gravity. The post locating tab fits loosely into the 1/16" brass tube, although it is not required at the gable wall end, and will shortly be removed. |
Next step
was to fit the edge etch. Folded like the main veranda etch. This part required
a lot of brass removal, with regular trial fitting so as to not
remove too much material
Soldered to
the original at 90 degree angle, once again, test fit.
Lastly (for
this blog), I soldered the fret to the poles with 144 C degree solder. By choosing a lower melting point solder, my
original soldering would not desolder.
 |
| The fret is not quite sitting right - it should be a bit closer the middle of the gable end blockwork. This was a bit disappointing, but I believe correctable in the next stage. |
A good start. I think the etch has really captured the feel of the prototype. I have sent my pictures to Ross, and he is also well pleased that the etches have worked well. Was that ever in doubt?
Next time -
The veranda roof.
Progressing well Rob Ross needs to get worried your skills are great
ReplyDeleteThank you for your kind words. Whilst I am pleased with my progress, I have a long way to catch Ross when it comes to outright modelling finesse.
DeleteAll I can say is WOW! The etched verandah is really going to set this station apart. Absolutely fantastic Rob. Keep up the good work.
ReplyDelete