Humula Station construction starts
Plus an auction & repair
Humula station was opened in 1917, with the first stage of the line from Wagga Wagga to Tumbarumba. Officially closed in 1975, with the last train departing in 1974.
 |
| In 1973, a CPH #7 railmotor pauses at Humula. |
The station never had an awning, and didn't seem to match any standard NSW station design that I could find. The below are images from the internet, sent to me, or scanned with permission from the small booklets produced by Tumba Rail on the Tumbarumba line
 |
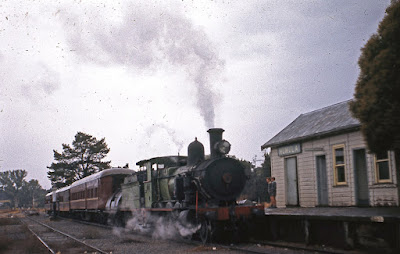
| 3142 and 3020 on a 1965 ARHS tour train watering at Humula. The station and signalbox are visible ahead of the train. |
 |
| 1965 |
 |
| Tour train |
 |
| Last train leaves Humula in 1974 with the remaining wagons, just a week before flooding washed out the bridge at Tarcutta. |
 |
| Station building, and signalbox. The sign on the signalbox says "office" |
Without a plan, or measurements, I based my drawing on the door and window dimensions from a standard PC3 station. The length was a bit of a guess, but I have tried to maintain an equal spacing with the 6 vertical battons on the platform side. The rear of the station remained a mystery, and thanks to Mark Pottie, who sent me a better image of a tour train than the small image (of the same picture) in the Tumba Rail booklet, I had some idea
 |
| This is my only picture of the rear of the station, and one has to look beyond the signal box to see 2 windows, and a loading platform. The train is the 1965 tour train, and the background has many more structures, including a sawmill that will eventually be modelled. Thanks to Mark Pottie for the image |
 |
My quick scale drawing. Interior details are a guess. The middle room is identified as a waiting room, but as the station office is in the signalbox, the large room on the RHS is a bit of a mystery. Other things to note - windows are a sash design, without the vertical mullion, and there was no chimney visible on any of the pictures I have.
|
 |
| Station rear. I am using an Evergreen styrene 0.060 V groove x 0.040 sheet. I have always struggled to cut out window openings, but this method seems to work for me. After cutting around the window openings, I use a dremel cut-off disc to melt a pair of diagonal slots through the styrene. Then, I continue the cut with a#11 blade hobby knife to the previous cut. Snapping off the styrene "triangles" follows the score and snap techique often described. Cleanup with a file, or carefully with a knife. |
 |
| All 4 walls, floor, and interior walls cut. The roof vents in the gable ends will need to be cut before assembly. |
An auction
At the beginning of this month, a well known auction house in the Blue Mountains was having their regular 1st monday auction. Well worth a look at their on-line catalogue, occassionly find something that one can use
With covid restrictions, all you get is a single photograph to whet your appetite. The auction is conducted through the web.
I wasn't planning to bid on this lot pictured below, as it had a start price of $25 and the description said fair to poor condition. However, no bids, and the auctioneer dropped the start price to a miserable $15, which was encouragement enough. With no other bids, I won this lot for $15.
 |
| As shown in the catalogue:- there was a good K wagon, an S truck, a pommy brakevan, a number of other wagons which didn't have wheels, kadee couplers, two containers, and a tank load. Not the best presentation |
There is an 18.5% commission on internet bids, plus a cost of postage and packing, that includes a commercial hourly rate for the packing.
It wasn't the only thing I bought, and the share of the postage for my wagons was just under $12. So, about $30 investment.
Australia post took about 2 weeks to deliver. The box contained the above pictured models, plus some extra bits and some 26mm axle length wheelsets. The wagons were in a sorry state.
Here is the results of the repair:-
 |
| Epoxy Rails North K truck. The loose underframe visible in the auction picture belong to this one. Reunited, lacks brake wheel, but nice runner |
 |
| Calipari S truck kit. The heavy di-cast tank load removed, and the 25mm axle length wheelsets replaced with 23.8mm axles I had in store. Brass bearings had been fitted. Now rolls nicely. Needs brake wheels |
 |
| Calipari ABV van had only one sideframe, but the other sideframe was loose in the box. Using the 25mm wheelset from the S truck, glued the other sideframe in postion. Also missing brake wheels |
 |
| Lloyds or Protype ABV van. Whitemetal. Missing wheelsets, but did have bearings. 23.8mm axle wheelsets installed, and a great runner |
 |
| Austrains K truck. Only removed the container. Good runner |
 |
Protype S truck. Whitemetal. Removed the horrible tarp, and again, installed 23.8mm wheelsets. Good runner, but will need a repaint.
|
All up, even with the extra cost of the 23.8mm axles, I am happy with my auction win as most of the wagons could be used on the layout.
Another repair.
Last week, a mate asked me to have a look at a Bergs C30T he had just got out of storage. He could not get it to run
 |
| Bergs C30T - model dates from around 1981, made by Kumata (japan). 3028 has been custom painted, and lightly weathered. |
 |
| After removing the body (3 screws), the cause of the failure was obvious. The rubber link from the motor to the gearbox had failed. |
 |
| Replaced the rubber with neoprene tubing, and a light lubrication on the mechanical moving parts |
The repair took under an hour, and most of that time was spent trying to locate my neoprene tubing. Reassembled, it runs sweetly.
---------
Until next time.


Nice outcome for your little auction haul. I've tried a few of them in the past, but it's often been a bit hit and miss. And at first I thought that may have been you at Humula station in that photo from 1965 until I read it through a second time. I'm sure you'll get Humula Station just right.
ReplyDeleteBest to not talk about some of the disaster lots that I have "won" from that source. Hit-n-miss is right. I would like to know the identity of those two. I do have a contact who was aboard the ARHS 1965 tour train, and whilst he gave me a story on the wagon recovery on the triangle at Humula, I hope that some of his pictures will eventually be located, and scanned. The station building had been removed when I first visited to station site in the early 1980s - but the signal box was still there.
DeleteHi Rob. I note your dilemma with internal details of the main station building. Upon observation of your photos I have observed some details that may assist you with location of the internal walls.
ReplyDeleteThere are some vertical mullions apparent in the external walls. The 1965 station photo shows 6 mullions in the side facing the railway. These all appear to be spaced at regular dimensions. This gives seven interior lengths of wall siding. It appears there are three panels for the “Out-Of Room”, two panels for the “Waiting Room” and two panels for the “Other” room. In the photo of CPH27 we can see there is a vertical mullion on the end wall in line with the roof peak. This finishes at a horizontal mullion apparently at ceiling level. The vertical mullion spacing could be at 6 ft, giving regular dimensions for the building of 12 ft wide and 42 ft long.
In the black and white photo of the tour train you can see the sun shining through the window and onto the internal wall of the waiting room. This confirms the location of the second internal wall to the right of the window in your drawing of the building. There are lots of other neat details in this photo too. The two bicycles, the station scales, the fire bucket, the glass station lantern and the wooden crate.
Good luck with your buildings. You are doing a fantastic job of scratch building.
Regards,
John Proctor
Thank you John for your observations, and suggestions. Yes, the outside battens are a clue to the building dimensions, and had picked up the 7 sections using the battens. I note that they are on the outside framing of the "Out-of-room" door. What size the door? - I got a 19mm width by looking at the PC3 station kit I had lying around. It is scaled slightly less than your 6' spacing, however, you are spot on for the multiply by 7, and the 12' depth. I think you may be right too with the waiting room internal wall - with your observation, and my checking the picture again, I have drawn it in the wrong position. Wouldn't be the first time....
DeleteYes, the little details on the platform will be fun to add.
Building models based purely on photos is an enjoyable challenge. Thank you for your advice. Much appreciated