The Goods shed at Ladysmith has been restored by The Tumba Rail group, and is one of the structures that has to be modelled. It is essentially a NSW G2 design, although, it was built "mirror image", and the side shed, and extended platform are on the wrong side. Ladysmith lost the extended platform, and side shed at some stage, although the evidence can be seen in the single window, and timber guards on the end.
I acquired a pair of NSW G2 laser cut kits from Walker Models. As with the Ladysmith station building, having access to Greg Edwards Data sheets, and pictures of the prototype helps, as the kit instructions are rudimentary at best.
The first thing I did was remove the extended platform, and reverse the end wall framing, so as to get the window positioned as per Ladysmith.
An aspect of the kit disturbed me:- this, was the thickness of the planks on the loading platform. After some deliberation, I carefully thinned the edge of the platform, made up dummy joists, and painted the "hole" black. Once the bearing timbers were in place, it would be difficult to tell that these holes don't extend into the shadows.
The corrugated wooden overlays were fitted over the assembled shed, noting that I had to manipulate the ones around the window that I repositioned. The overlays do not fully cover the sides, and the prototype shed has an exposed wooden framing, at this point. But I ended up just cutting some more corrugations to cover the gap.
The bearer beams at the bottoms were heavy 10" x 12" North Eastern strip wood, I happened to have handy. I positioned these beams by referring to the prototype pictures.
Once completed, I painted the outside corrugation with Floquil grey primer., and the wooden deck with Floquil rail brown .
I then fitted the timber guards provided by the kit, but on reflection, these are too wide Unfortunately, by the time I realised it, the glue had gone off, and I would have caused damage to remove them. Maybe the next G2 goods shed, at Borambola will have correctly sized timber guards.
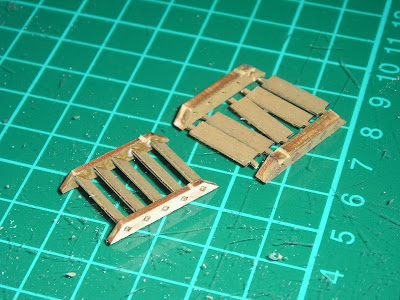
The kit provides two sets of steps. Once again, I was not convinced that a scale 12" thick step support looked any good, so I simply used the sharp knife, and the 12" became two 6" thick supports It was surprisingly easy, as the "timber": is actually compressed board, and can be cleaved with little pressure . After gluing, and then sanding the edge, I was mush happier with the steps.
The windows on the kit are marginally undersize, but once made up, they looked OK. However, I added window surrounds with North Eastern stripwood.
The roof was my next step. As per my normal standard, I like to have the roof removable, so as one can access the interior for super-detailing, or simply for fitting a light. Fortunately, the kit has very positive locking for the roof trusses.
Keen observers may notice the extended roof support angles. These were made from 2 x 4" northeastern stripwood, glued into holes made at the appropriate angle. A fiddly task, to get all of them aligned, and probably the reason why the kit does not provide these parts. I also fitted some guttering to the roof. Colours used are Floquil Silver, Depot Buff, and Roof brown.
Lastly, there were the brick piers. The kit provides a laser cut integrated bearer beam, and post, which I am sorry, looks ugly. After more deliberation (and coffee), I came up with a simple method, that used material on hand. A balsa rod, approximately 37 scale cm square was made by cutting, and sanding, and after painting with Floquil Concrete, cut into 20 equal lengths using my chopper tool.
Whilst my Australian made chopper was bought 30 years ago, a .NSWL chopper would work equally well. Once all the piers had been cut, each one was wrapped in brick paper - which could be printed off the internet, although mine was a commercial sheet made by Superquick. All the piers were then glued to a temporary base of thick cardboard
I have not fitted downpipes, as I need to do some more research on when the water tanks were removed. I also have the superphosphate sign to add when I can figure out how I manipulate images in Adobe Photo Elements.
Anyway, I will leave you with a few more images of the real goods shed at Ladysmith. Happy modelling


Nice job Rob! I'm keen to see the end result once the super-phosphate sign and some subtle weathering is complete. I also strayed from the plans a little to modify my G2 kit on Philden. Otherwise, it was a fun little kit to build.
ReplyDeleteThank you Phil for your comments. You are right, weathering is needed. I enjoy tweaking a kit, as it individualizes the model, as well as I hope, makes it better. However, I am indebted though to the cottage industries out there, who not only do all the hard work in the design, but also source the parts. I am liking Walkers Model building kits, as they are well engineered, and easily modified
Delete