Showing posts with label train room. Show all posts

Sunday, 18 May 2025

Albury Model Railway Exhibition 2025

 Murray Railway Modellers - Model Train Show 2025

Pacific National NR40 and another NR rests in Junee Yard in late April 2025

On Sunday, May 18th, Pete and myself headed 2 hrs south to attend the annual model railway exhibition at Mirambeena Community Centre at Lavington (Albury). 

Campbelltown is a N scale layout, originally constructed by the late Mick Lovell in his home garage.  Fortunately, the layout was extracted, and rebuilt for exhibition, rather than lost in a skip.  I understand this was its first outing.  The real Campbelltown is now served by electric trains from Sydney, and the country feel is now lost to history.  


The branchline to Camden branches off and heads up the 1:19 grade to Kenny Hill.  This route is now the multilane Narellan Road, and any evidence of a railway line over the hill has been lost.


Rejuvenating the layout would make a fascinating story, and I hope that this tale could be published.  

Barambogie is a freelanced layout for displaying scenery, and running trains

A new corner section displays quite a good number of structures in the town.  (Spot the Harry Potter bus)

Shame about the layout identification sign in the scene

Cockroach Valley, by Kevin and Dot Bush has been around for decades, but the layout is always changing and improving

Another busy town, with lots of structures.  


Kookaburra Park is a new layout built by Darryn Coulston.  Darryn retired his earlier Kookaburra Park.  With experience, the new Kookaburra Park has addressed some of the former layout's shortcomings, whilst reusing some of the structures to speed up the construction process.


Vintage Hornby are OO sized trains made prior to 1964.  The layout showcased, besides the trains, many of the lineside accessories that Hornby made.  These trains were built to last, and it is encouraging that they were running flawlessly whilst I was watching.

The sunshine that came through the roof window has unfortunately washed out the colour from part of the engine shed in my picture.  The layout lacks basic scenery, although this aspect of railway modelling was rare when these trains were made. 

Wimmera Plains by Silvano Marchesini is a prototype freelanced layout, loosely based on the Wimmera region of Victoria. Originally a home layout, it was converted to an exhibition layout with help from the Grampian Railroad Modellers of Stawell. Silvano has made many of the structures from scratch.

The layout is a large oval, with an operating pit in the middle.  Without any backscenes, the station in the background can be viewed.  


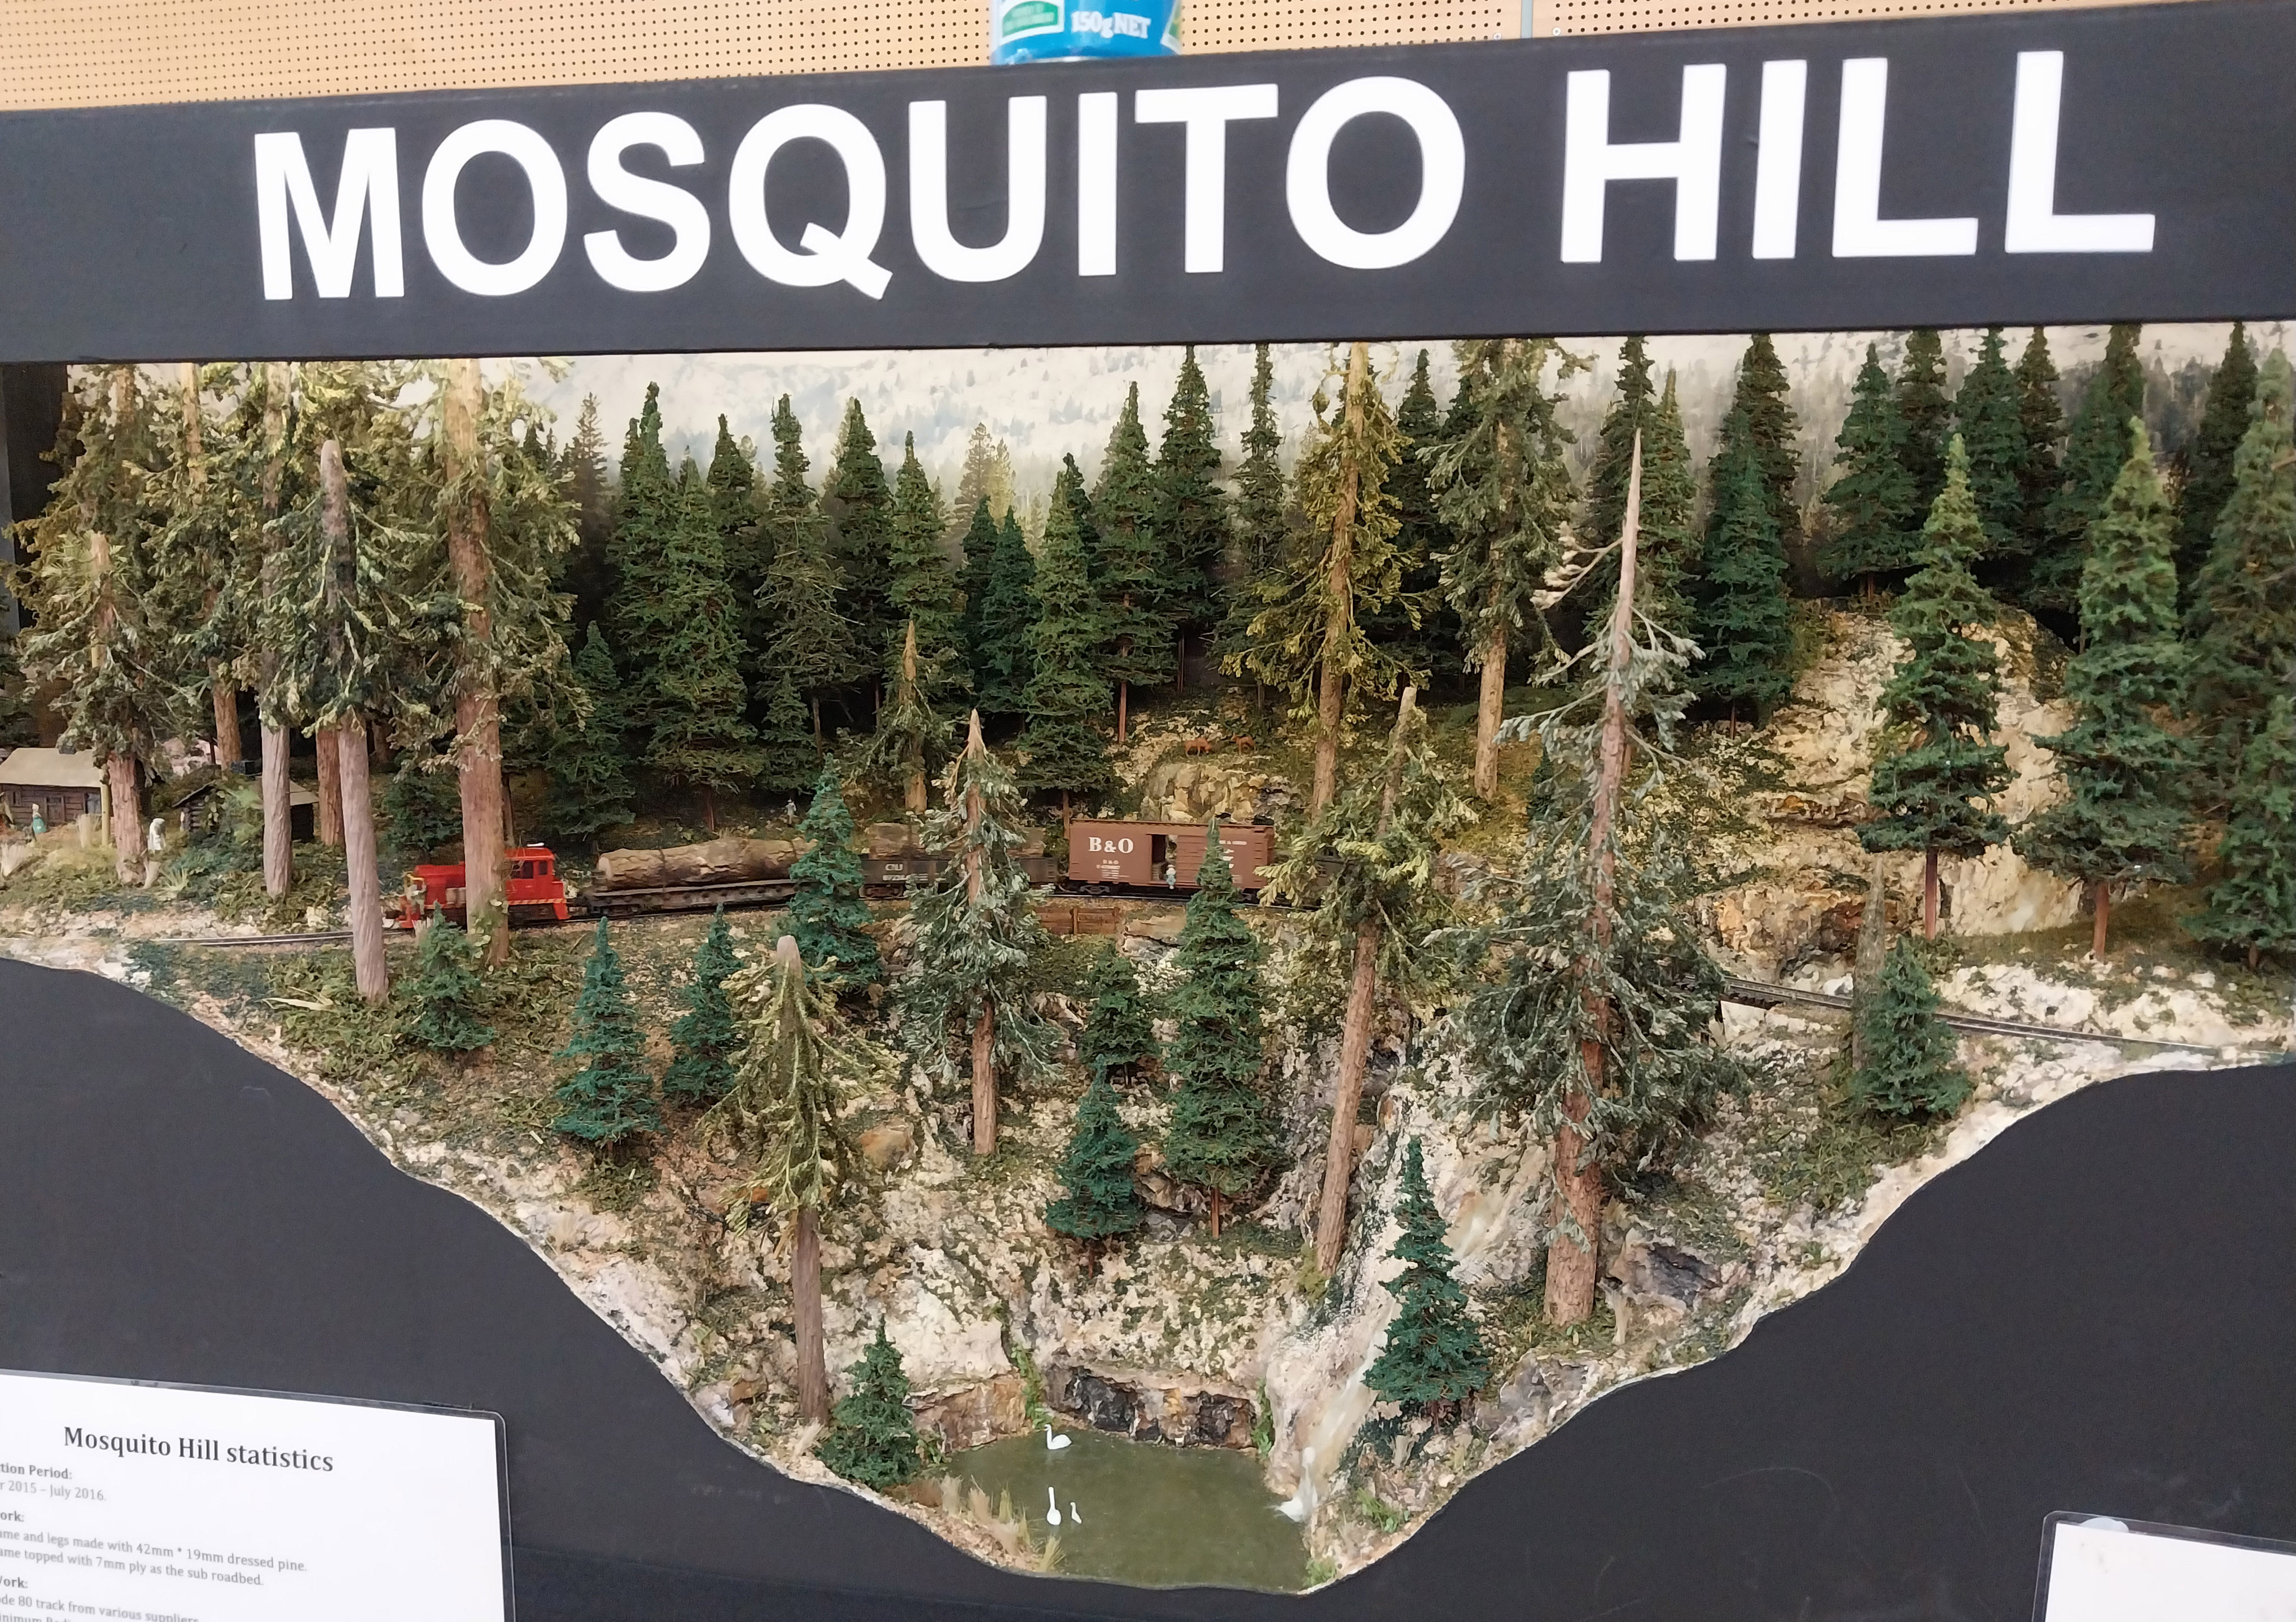
Bears Ears and Mosquito Hill were what I call moving dioramas.  These dioramas are good to try out new ideas in a limited space, with limited time. Both layouts were accompanied with an A4 size display booklet, that could be read to see how the layouts were made.  Nice idea.  


Ettamogah by Peter Allen and Greame Schulz is another layout that has been around for a long time, but is constantly being detailed. Modern and not so modern trains were being run.  The real Ettamogah Rail hub is visible from the Hume Highway.


Truck rollovers are unfortunately becoming quite common on the Hume Highway this year.  The detail here was worth a second look. 


Trees might hide the trains, but they have been modelled very nicely.  

Other layouts were Tomy Plarail (Tomy), and Railway in a Case (Z scale)

Retail support

Going to a railway exhibition, would not be complete without some retail therapy.  

SDS

Trackrite

Train World
Not pictured - Junction Models, Road & Rail, Ian Alce, RW Hobby, Railway Mercendise & Custom Printing, George Agapitos, Railway Coins, and S/H stands run by Murray Railway Modellers.  And of course, there was a Cafe, selling drinks, and food.  

To me, an exhibition is a way to talk with fellow modellers, and gain ideas that could be useful.  And it is also imprtant to support those retailers, who have supported the hobby.  And it is win-win, as much of what I bought is useful for my own modelling.

My purchases.  The selection of tools was $10 from the second-hand stall, and S/H but near new was the Auscision WTY Wheat hopper pack

Train room activity.

I managed to install some items in the ensuite, to get them off the floor of the train room.


NSW Carriage Mirror, kindly donated by Les from South Australia, has been through the wars

The back of the mirror shows that some of the silvering has been totally removed

I added some very shiny Aluminium foil to cover the hole in the silvering, but the damage is obvious.  And on the glass, someone has scratched "MARK" - which I didn't notice until I had polished the grime off the glass.  All part of history.  I had earlier installed the NSWGR luggage rack on the wall - this rack is a reproduction, acquired at the Cootamundra swap meet last year.  Note the reflection in the mirror are the block shelf instruments above the door leading to the garage. 

We are getting there slowly.  Installing the mirror and the luggage rack has almost completed the ensuite; just some painting to do in an awkward spot that I cannot reach as I am not tall enough, even standing on a stand that fits inside the shower. 

Conclusion.

Thank you to the Murray Railway Modellers, the exhibitors, and the retailers who made the Albury Exhibition most enjoyable.  It was a good day out.

Until next time, build a model (or two)

Saturday, 24 August 2024

Albury Staging yard design finalisation

 Albury staging  yard -or- chicken scratchings on the floor

6029 visited Junee in June 2019.  This image of the engine being prepared outside the roundhouse has nothing to do with this blogpost, just thought I would share a happy memory

Stub ended yards at both ends of the mainline, are a feature of an "X factor" layout design, which allows for trains to be remarshalled easily at the end of an operating session, without the need to traverse the entire layout.  I wrote up the design theory on an earlier blog post written 7 years ago.

https://buildingwagga.blogspot.com/2017/08/x-factor-layout-design-theory.html


The diagram from the earlier Blogpost shows how the yards connect to the mainline.

The Albury staging yard will be a stub ended yard comprising 13 tracks.  That is the current plan. 

The trackplan gives an idea of where the staging yard tracks will go.  This diagram was more illustrative, than accurate - and failed to include the doorway to the garage. 

Drawing out the yard tracks - Take 1

Since drawing out the Bomen station, and loop to confirm that the aisle access is adequate, this also provided me with the maximum dimensions for the yard "baseboard".  I placed brown paper over the Bomen level drawing, and chalk was then drawn to represent the yard tracks.

5 stub tracks at the rear, and 4 at the front.  There is a 1 metre steel rule near the skirting board, to give an idea of the siding size.  Note. The staging yard brown paper hide the paper and other lines are for the Bomen station level, which will be built 20cm above the staging yard tracks
The fan for the 9 short staging yard tracks 

The fan for the long 3 metre staging yard tracks at the other end of the wall.

I let the design sit on the floor for quite a few weeks, whilst I pondered.  I was not overly happy with the turnout positions, as they would be awkward to access when the bomen station is placed just 20 cm above the yard tracks

Take 2.

Making changes with chalk is a lot easier than after you have laid track.


A modification to the location of the 9 siding fan brought all the turnouts closer to the edge of the future baseboards, and thus I hope, will be easier to access.

Like before, I let the design sit on the ground for a while.  The shortness of the sidings near the skirting board seemed a bit short.  Was there a way they could be increased in length?

Take 3

Removing one of the rear sidings, and adding an extra siding to the front group has effectively increased the length of the 2 short sidings - the new siding at the front is now just over 2 metres long. 

Each of the yard track "baseboards" will be around 40cm wide.  That will easily accomodate 5 tracks, plus the wiring.  I am trying to avoid wiring underneath the staging yard tracks as much as possible. 

More structure placement

The Murrumbidgee Bridge

Just two 159' spans of this 4 span bridge were made.  Disppointing aspect to me, is that the 5km long approach viaducts will be considerably shortened   


An ebay purchase of a scissors crossover is positioned behind the backscene of the Murrumbidgee River bridge (chalk shows the location of the bridge

The scissors crossover is a bespoke piece, made by the UK track wizard Patrick Nichols.  It uses 4 modified peco medium radius turnouts, a shortened crossover, to achieve a track centre of just 51mm.  It wasn't my first choice.  Somewhere I have stored two Shinohara scissors crossovers, but after I spent far too much time searching for them, I guessed they would turn up only if I bought the Peco version.  

NSW 40 class - Another ebay purchase


Pair of 40 class engines at Wagga in 1955.  (Photo by Stormont).  

One cannot have too many engines.  

4004 - a Lloyds kit

The seller advised that he had purchased 4004, assembled, painted, and ready-to-run from Lloyds around 20 years ago.  " A good runner, and DCC fitted" was the claim.  

I know the model well, as I also made one from a kit.  Eureka models have subsequently imported  excellent injection molded 40 class made in China, so the older kits have lost some desireablility.  

On my small test track, I discovered the DCC chip was a ESU-Loc pilot (non-sound), with a very large keep-alive capacitor.  However, 4004 was not a good runner.  To cut a long story short, one of the geared axles in the K&M mechanism was split, and after removal of this gear, the engine now runs sweetly.  I may not need to replace the gear, 4004 has enough weight to run fine on 5 axles - the prototype actually only had 4 powered axles, the centre wheelset on each bogie being unpowered.

Another delivery

Les, who now lives in Adelaide, and well known for the South Australian modellers convention, contacted me with an offer I could not refuse.  A NSWGR carriage mirror.  This would be a great addition to my train room ensuite.  The only concern was getting the mirror to me without breakage.  Les though had the answer.  His friend Geoff was planning a big road trip, and included me on the itinery with the fragile mirror.  But I was not prepared for what Geoff was driving.

Geoff was on his way to Townsville to race side-car motor-cycles (stored in the trailer).  He had 2 months to get there.  I had a quick inspection of the bus - it is an amazing conversion to become a travelling home

The mirror has lost some of the silvered backing, and this shows up as dark marks in this picture.

Before I install the mirror, I will try and do some quick restoration using aluminium foil.  A full restoration, to completely replace the mirrored backing is something for the future.

Train room update.

I am pleased to report that the train room is nearing completion.  

The ensuite is now ready for use.

And the warning sign regarding use of the WC is now affixed to the wall above the cisten.

Metal weather strip to protect the edge of the floorboards onto the concrete path beyond the door


Painting the door and trim around the doors and windows is taking time.  The gloss white is such a pleasant change from the tired pale yellow.  A second coat will be needed on the doors.

Not everything has worked out.  There has been some significant subsidance of the earth packing around the septic tank.  Understandable, as the bob-cat couldn't really pack the dirt firmly, or the septic walls would have been crushed with the weight of the bob-cat.  My plumber assessed the damage, and fortunately, there wasn't any.  He suggested filling the holes with fresh earth.  This process has started with 6 wheelbarrow loads of sand.  The recent rain has made a few more holes, so I guess I will need some more sand. 

Conclusion

Getting a train room has been a long process, but the end is now in sight.  Money spent thus far is just over $39,000 - which was more than I was expecting, but still fairly cheap for a room fitout.  Of course the layout build is still on the agenda, and I  am looking forward to starting. 

Until next post, build a model or two.


Friday, 10 May 2024

Train Room update


An update on the train room


Last week, I am pleased to announce that the last major piece of my Train room was installed, 40 metres away from the room.


Returning back to the depot.  I had just paid for the gravel and sand used during the septic installation, when I was stopped at the level crossing near the Junee Chocolate factory.  Well, that was an opportunity to do some picture taking

Before I  bought my house in 2014, I noticed that there were holes in the concrete slab at the back of the large brick garage.  I assumed that these were to serve a small bathroom, as there was also a partially built brick wall to enclose the facility.

The future ensuite location, in the process of removing the brick wall.  Note the pipework in the slab.  Note too, that I had a problem with storage - here are some of the plywood sheets that I acquired in 2017, which are destined to become baseboards. 


In 2017, the holes were investigated, and we found that the holes were indeed plumbing, which unfortunately didn’t extend past the end of the concrete slab.  So, before landscaping and new paths were installed in the backyard, pipework was extended from the slab, down the slope, and terminated in my horse paddock.  

Stormwater, and septic pipes share the same trench down the slope from my garage.


And there is remained until last week.   Cameron, my plumber for the train room, wrote up the request paperwork for a septic installation to go to Council, and approval came shortly later, with a few changes

Septic installation in pictures


The septic tank is 3200 litres, which was a change insisted by the council.  It is actually bigger than the tank we have for the main house!  It arrived on the back of a reece delivery truck, with the other material, pipes etc needed.


Finding the end of the septic pipes required some deft work of Dave, with his digger.  Fortunately located exactly where we left it

Dave digging out the hole

The hole had to be 2 metres deep, 2 metres wide, and at least 2 metres long.  Fortunately, no rocks encountered, just clay.  

Some idea of the depth with a ladder

The pipework from the end of the earlier installed pipes, did a right angle bend to reach the septic.  Due to poor timing, I missed the actual moving the tank into the hole, as I was donating blood at Red Cross donation van in Junee that day

The rubble pit beyond being dug.

End of the pipe in the rubblepit comes up to a small access point.  The pipe was then covered with a cloth, and then buried in sand

Some pipes being used as future anchors to stop a tank from popping up if the soil gets waterlogged

Dave pulling back the dirt, to cover the rubble pit

Once the grass grows back, just the access points will be visible


Sink, and Hot water installation


Cameron installed the sink, and cut the awkward angles to connect the outlet pipe to the pipework previously installed.  Truely skilled


More careful cutting of pipes, this time the copper lines to the hot water system.


The hot water system took 50 minutes to heat, and I tested that the hot water was correctly orientated in the sink mixing tap.

Having a comfortable room

An ensuite and kitchenette may seem like a luxury, that is not needed for a train room.  I don’t think so.  A comfortable environment for construction of the layout, and later, for the enjoyment of an operating crew will pay dividends.  And, not having a parade of modellers tramping through the house will maintain harmony with others (and pets) that are not interested in the train operation sessions.  I have been blessed in experiencing some excellent “Crew Lounges” over the years, and whilst a full lounge is not my plan, I may later be able to expand into the rest of the garage….just don’t tell the Boss


I visited Bill's layout down in Victoria last year.  His crew lounge is well appointed, with a kitchenette, TV, loungechairs, table, plus trains, and pictures to view.


Planning 1:1 scale.

As the rest of the train room is still awaiting final completion, I am continuing with my brown paper, and chalk drawing full scale on the floor.  Making use of my existing structures gives some life to the plan, and also aids in the determination of clearances.  And chalk can be erased, and reapplied.


 Placing the Bomen station, and Station Master Residence allows a good interpretion of how the scene will look.  Note The gap behind the brown paper. This is for the ramp from the staging yards to Shepherds Siding.  That will be hidden behind the Bomen backscene. 

There is plenty of space behind the buildings - possibly too much, so this is an area which can be squashed.

After removal of the structures, the brown paper can be rolled up. 


My original idea was that Bomen would be mirror imaged, and the station master residence be sited close to the station   However, having both the buildings close to each other gave problems.  It impacted the size of the Bomen yard tracks, and the Station Master residence (SMR)  looked visually much bigger than it should.  I haven’t measured the SMR, but I now think the Walker Kit is overscale.  Placing the SMR the other side of the level crossing breaks up the visual comparison, and gives more length to the yard loop track.  I also note that 600mm wide paper is a lot wider than it needs to be, and this will be made thinner once the staging yard baseboards are chalked out. 


Final thoughts

The Septic installation was the last major expense for the train room.  Whilst the ensuite is still a way off finishing,  layout construction can start as soon as the skirting, & trim is nailed to the wall,  and nail holes filled & painted  Hopefully soon.


Until next time, build a model or two.