Monday, 14 December 2020

Wagga Wagga station - Platform side pictures

 Wagga Wagga station construction - pt4


I managed to get over to Wagga station 2 weeks ago - and arrived just as the Melbourne bound XPT was departing. Sorry, I had hoped to capture a picture of the train, alas, it wasn't to be.


A picture from the past.  Blue livery Countrylink on the platform, with the Melbourne bound steel train on the main. The original heritage colours of deep maroon, and cream is probably the scheme I will be adopting for my station

However, the main reason for the visit was to photograph details of the station on the platform side


A selection of pictures at the start of December 2020.  Note the platform seats have social distancing due to Covid19 restrictions.  Also note the extensive metal lacework.

As my only plan of the platform side, is in the end-papers of the book "The Greatest Public Work", by Robert Lee, I was quite chuffed to discover that most of the windows, and doors were virtual clones of the ones on the roadside.   Of course, there are some differences, and I measured those.


                    1879 Plan of Wagga Wagga station.  This would be a great plan to frame.

  And there were some differences from the 1879 plan - noteably two doors on the eastern end (RHS on the plan above), had been converted to windows.  I will build what is there now


Initial cutouts for the 5 main wall assemblies for the platform side.  I have not yet made the distinctive triangle parts for the roof (like I did on the roadside view).  I subsequently discovered a warp in the styrene backing for the roadside triangle area. Whilst this is fixable, I would rather avoid creating the same problem on the platform side.  


I have made a start assembling the walls into a proper structure.  Blending the "stone work" on the corners is something that I found impossible to do when the walls were flat.  Both the roadside ends are now ready to join into the platform walls, once they have been detailed.  Keen viewers will note that there is another "room" to be added onto the end walls.  An assembly task that can wait for now


A triangle gusset assists in strengthening the join.  I have left a 0.040 gap at the bottom for the future "floor". 

I wish everyone a happy xmas, and a more productive new year.

Until next time.


Saturday, 28 November 2020

Wagga Station Building construction - pt 3

Modelling challenges 

Yesterday, whilst I was at the workbench,  a storm brewed up to the west of Junee, and was about to make its presence known.  It hit my place around 1pm, but as I discovered later, my place got off lightly, with just broken tree branches, and upturned pots on the veranda.


The Junee Roundhouse lost part of its roof in the Nov 28th, 2020 storm

It is often said, that when one builds a model, to show off the interior, one should make the roof removable.  But I don't think this is what they meant

The roofing iron from Bay 7 is drapped over the exhaust vent of bay 8

A wide angle of the previous shot. Quite a number of Graincorp 48 class engines are stored in the open.  The Graincorp 48214, previously 48148 shows evidence of the poor standard of the latest paint

Roofing iron from Bay 15, 16 or 17 were blown towards the east, and landed on the stored 48/830 engines.  This and the below 2 pictures were taken off the Junee Community facebook pages,  The iron had been removed by the time I took my pictures. 

Probably the brightest "inside" view of the roundhouse I have seen.

48 class locos being refurbished/serviced in anticipation of the bumper harvest. The roofing iron over bays 5 and 7 had been peeled back.  It is possible that this iron was originally installed in 1947 when the roundhouse was built.
==========

Anyway, back to the Wagga Wagga station build.  As I mentioned on my last blog post, I am recovering from a nasty leg infection.  As a result, I can only spend at most an hour at the workbench, before I need to have a break, and rest my still partially swollen leg.  The upside, is that I am trying to get two or three sessions in per day, in the morning, after lunch, and around 7:30pm.  Progress is now steady.


The main entrance wall has been fleshed out.  I try and make small improvements to my process.  The  doorway on the RHS has had the arch detail installed, and by using the 0.040 styrene below as the guide to "hollowing" it out, I saved a bit of time over the previous brass pattern method.  Once the arch is formed, then the door insert will be added - result looks like the door on the LHS


Marking out the parts was a matter of using my field measurements, converting them with a calculator to 1/87, and drawing them directly on the styrene.  I even broke out my high school tech drawing compass for the arches over the windows


One of the windows on the LHS veranda.  

The LHS Veranda has 3 sets of windows.  It is effectively a mirror image of the RHS veranda


After some more detailing, the pair of wings looked like this.  RHS on top, LHS on bottom

A washed out image due to the sunlight, and the dark background, but 5 sections routhly positioned to show the main station size.


Further detailing on the LHS wing.  The plastic count of parts of just this wing is 233.  It is important when building walls to get as much detail on them whilst they are flat on the workbench, because once they have been assembled into a 3D structure, things become more awkward, and the structure is subject to damage.  The main Wagga station is around 550mm in width, not counting the small extensions at the ends, that will be made later.  

I will not kid you in saying that this build is straight forward.  Just from a time factor.  Already, there are some  (hopefully) minor errors that will be difficult to correct.  I may  fill you in later with these, but the upshot is, I have enough building left without worrying too much to rework to get things 100%.  I will learn from the experience should I ever have to build another model of this complexity.

But, I have to get over to Wagga again, and take detail shots, and measurements of the platform side wall.    My current batch of pictures was taken from Railway Street, and whilst probably OK, as this side will be hidden from viewing when the station is planted on the layout, I would like to get it right.  I was told the best time to view is after the departure of the Melbourne bound XPT.

Until next time, stay out of the wind.


Saturday, 14 November 2020

A change of pace - the modelling blues

 Why does it take me  so long to build a model        

Since my last blog post, I managed to catch a nasty infection in my leg, and spent a week in hospital.  I am on the improve now, but, disappointingly, I have also not been back to the workbench for over 2 weeks.

Tour train at Wagga


So in a total change of pace, I have a small story for you.  Some of the accompanying pictures have no rhyme or rhythym to the Wagga project, but they all have a story to tell of the adventures in modelling

It has been almost 10 years since I made a new year’s resolution to construct, repair, and/or paint one locomotive model a month until I ran out of models.  Well, until I made the move to Junee in 2014/15, I was almost keeping to that schedule.

However, whilst I was pleased with the results over that  4 year period, I often was frustrated by my inability to build quickly.  So I thought I would analyse possible reasons for slowness, so maybe I can improve my speed.

  • Ebay: The worldwide marketplace is awash with kits looking for new homes.  And I consider myself as running a foster home.  So, I spend around an hour a day looking for unwanted models.  My interests are wide.  This could be the reason why my kits supply has not dried up
  • Procrastination.  This is the problem of lots of projects, and owning  lots of kits.   I am spoilt for choice.  Where to start?  What to build? Some of the models I have owned since the 1980s, but others are more recent.  And over the years my interests have changed.   Whilst I now concentrate on Wagga, I still get distracted.  Sometimes it takes me a lot of time to decide what to build.
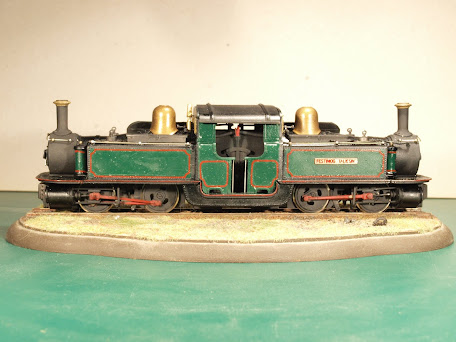
    Ffestiniog Railway Double Fairlie.  Wrightlines kit in O16.5 scale. I bought this kit in 1992, and took 22 years to actually build it.

  • Challenge yourself. Problem solving is a great way to keep the grey matter active.  A challenging kit can also take longer – much longer than a simple kit.   Fortunately, but also frustratingly, instructions, and exploded diagrams are often deficient in information.  Working through the steps to construct a locomotive kit can give one a greater sense of achievement than buying a ready to run model of the same locomotive, even if the cost is more.
    GCR ROD 2-8-0.  Buit from a Keyser kit in OO scale.  I have painted it to JA brown's #17. This locomotive kit was bought cheap on ebay as it had no instructions. Finding instructions was another story.

  • If I own more than one kit of the same locomotive, I should build a second, or third locomotive kit immediately I have finished the first.  This would allow me to benefit from the experience of the first  loco build, and reduce the time needed to build the second, and subsequent model.  But where is the challenge in that?
  • Research.  My personal library is quite extensive, and looking for information in my book collection is very enjoyable.  But it can also be a major time waster.  On occasion I do not have the information I need.  The internet is a great resource if you know what you are looking for, and don’t get sidetracked.  Modelling forums are not for everyone.  Emails are great too.   And when all that fails, nothing beats visiting your prototype.  Make a trip of it.  You might even find another model loco that needs to be built too.  Have you ever recalled that you have seen an article in a magazine.  Great, but you don’t have an index.  No problem, looking through magazines is fun isn’t it?  A new idea on every page.
  • Loosing bits on the floor.  This can provide an instant halt to any model construction.  I am not sure the best way to stop this.  In one kit, a DJH NSWGR Z13, one of the romford wheel nuts dropped to the carpet.  I then spent the next hour looking for it.  I have no idea how it managed to roll or bounce over a metre away, but it had.  Sure, I could have raided a nut from another unbuilt kit, and then ordered replacements?  I even contemplated taking a 10BA nut, and filing it down to a replacement size, but once one starts a search, giving up is not an easy option.  I have not mentioned some of the parts that I have never found over the years.  The other thing that I did with the Z13, was misplace the nuts and bolts.  I had carefully taken these out of the DJH blister pack, placed them in a small zip-lock pack, and then lost them on the workbench.  And speaking of the workbench....
    DJH Z13. I built this model in just over one week. 

  • Workbench a mess.  I like to have all my tools, paints, and supplies close hand.  My workbench is a large office desk, but my work area has shrunk to around 30 cm square.   I suspect this is a common problem, and whilst in the process of kit/scratch building,  I am rather poor at returning things to their correct places.  Of course I realise that 30 cm square is far too small for efficient model building.  You would think that with so little workbench being used, it would be impossible to lose track of the tools you use.  Fear not, I spend much time looking for tools that have been buried by other tools, or parts of the kits.
    Ten Chilvers On30 kits, awaiting paint.  The clutter of my workbench is obvious.  I bought these wagon kits in a bulk lot on ebay, and wanted a change of pace, and assembled them all over a few weeks. . Yes, I have an interest in On30 - and occassionly need to feed the habit

  • Tools breaking, and spilling flux.  Probably as a result of the workbench deficiencies, I seem to run into problems. Recently, my bottle of BGM flux decided to fall over and a tremendous quantity of flux oozed around tools, paint bottles, etc, and under my glass plate working surface.  It took a long time to wipe this up.   Breaking drill bits is also something that frustrates – particularly the small diameter ones.  But hey, you can buy replacement drills on the internet.  Just wait then for them to be delivered. 
  • Missing parts.  I am jinxed.  I regularly find missing and substandard parts in the kits I build.  Some are easily replaced from the spares box, but others have to be fabricated from scratch.  Sure, one could  go back to the manufacturer if the kit is modern, and you had bought it from them, but 90% of the kits I own are ancient.  As an example, the NN I was building had the following  problems – one of the chassis axle slots was out of square by a huge 0.34mm; one of the Romford wheel nuts did not have a screwdriver slot;  and a turned brass handrail knob lacked a hole for the handrail wire.  The upside is that the satisfaction of completing a kit where parts had to be scratch built is far higher than an otherwise straight forward build
    DJH NN - Still in original build, but after the 35 class renumbering.  Makes it far too early to be a loco I can run on the Wagga layout. 

  • Kit modification. Building straight from a box is a lot easier than modifying parts.  But to not improve a upon a model, could compromise the effect you are after. 
    DJH D50 5148- modelled after the Albury shunting engine that was in use until around 1970. As Junee was the home depot, I suspect that this engine ran through Wagga to/from Albury - and would make a neat extra for the future operation. I have not fitted DCC to it yet

  • Assumptions  I could also put in the not reading the instructions properly, and having to reverse a number of steps to do something that I should have done in correct order.   And don’t rely on the manufacturer order either.  If I had built the NN body according to the instructions, soldering the external boiler fittings from the inside of the boiler would have been impossible.
  • Magpie and puppy dog distraction.   My workbench in my old house used to have a window, which lets in natural light.  Unfortunately, I had a very friendly family of magpies that loved to see  me working there, as it gave them a free meal.  All they do is land on the window sill, or the fence,  make me aware of their presence, and keep annoying me until I react.  I then get up, go to the fridge, get some mince, and go outside and feed them.  They were good breeders, with 2 youngsters in 2013,  and 3 in 2014.  The  youngsters learnt the parents’ trick, and thus I can be interrupted 2 or 3 times per hour.  Yes,  a problem of my own making, but over a period of building a model, I lose many  hours.  My place in Junee is not quite as bad, although the magpies, and pied butcher birds spy on my movements, and feeding them often takes priority.  And I haven’t mentioned the puppy dogs...
    Mum magpie

    One of the Pied Butcher birds

    "Rykar" collie - demanding attention

  • No decals.  Mostly a problem with Australian diesel kits.   Ebay may again provide a solution, but not all classes are covered.  For instance, I have a DJH/VR X class in grey primer for over 11 years awaiting decals.  Occassionly, I have had to take on a different paint scheme than the one I originally wanted.  Worst case though is to drawup the artwork and submit to a specialist decal maker.
  • Too complex a paint scheme.  Masking multiple colours, and extensive lining takes much time.  A lot of this is waiting for paint to fully dry.  Of course this relies on great weather...
  • Not starting another kit midway through a build.  Starting another kit is a recipe to lose momentum on the first kit.  Sure, certain tasks like waiting for paint to dry may seem an opportunity for starting a new kit build, but unless you are very methodical,  starting a second kit can multiply the problems.   Perhaps I should build 2, or 3 identical kits simultaneously.
    73 class - Bergs Whitemetal kit on K&M chassis  One of the ongoing problems in buying kits and not assembling them is that some RTR manufacturer will produce a far better detailed, and possibly better running loco before you get around to building your kit.  But would it be a shame to not build your model?  

  • Television.  I waste too much time watching the idiot box.  ‘Nuf said.
  • Youtube.  Probably a worse time waster than TV.  Recently, virtual conventions have provided significant insights into modelling across the world. 
  •  Blogs.  Authoring a blog has been one of the main reasons why I have maintained focus on the Wagga project for the last 3 years, although each blog post can take significant time in editing.  Then there is the time spent on reading the blogs of others.  Great ideas
  • Building models for others.  Something I am reluctant to do, as this takes priority over everything else. 


    A pair of O scale cranes for my mate Max Burke. Max wanted them a bit weather beaten.  The grey crane kit was missing parts of the jib, that I had to fabricate.

    Max is the owner of a model of the Morton Mill's lift span bridge, and I got to run my sugar cane loco (Badger BliBli kit) and sugar can bins (Greg Model Emporium) in a prototype accurate setting.

  • Scratch building.  There is great flexibility in being able to build what you want, without the hassle of not having a kit.   Although, it is important that one has sufficient “raw” materials, detail parts, plans and good photos.
    I always wanted to see if I could build an aerial ropeway tower, and the opportunity came with the 2017 Geelong Narrow Gauge Convention challenge. Losely based on the tower for Hercules Haulage at Rosebury Tasmania.  O scale. Brass angle and soldered construction

  • Attending NMRA, and other model train meetings.  Either in Canberra or close by – my travel time from Junee is in many hours per month more than when I was based in the ACT area.
  • Gardening. My house in Queanbeyan was a on a small 760 square metre block, and I deliberately avoided any plants that needed much care.  Mowing took less than 30 minutes.  The place on Junee though is more like a hobby farm size, on 1ha, and 1/3 is devoted to gardens and lawns.  I am spending close to 5 hrs per fortnight mowing, and the gardens, despite the extensive time I spend, look neglected.
  • And lastly, and probably most importantly, health concerns.  We are not getting any younger, and modelling can be put on hold at any time – often without warning.  Whilst good workshop practices can prevent cuts, burns, and eye damage, maintaining your health through good exercise, sleeping, good food, and regular doctor appointments will hopefully pay you back with extended quality of life.   This is a lesson I will have to quickly learn


A fully restored C38. This is a Model Dockard brass model that I acquired in severly damaged state. It had been submerged in water, and missing parts.  Fortunately, the corrosion was not fatal, and scrubbed up well. New Mashima motor, scratchbuilt parts, and WAO decals 

Lloyds 620/720 set. I bought this model from a second hand stand unstarted, but all parts loose in a plastic tub.  I will have to research if 620/720s were used on the Junee-Albury line. 

Lloyd 900 set.  This is a model I can use on the Wagga layout.  Fitted with DCC, I tested it on the Yendys layout whilst I was in Canberra. BTW, all the catenary on Yendys was scratchbuilt to NSW design - and I probably spent close to 150hrs installing it.

Well, when I stated the one loco kit a month, I thought that I had around 50 loco kits in the cupboard.  Well, at last count I still have OVER 50 loco kits.   And this is not counting the brass models awaiting restoration, and/or painting.   Are the kits  breeding?  I don’t think so, but I can’t be certain.  Am I having fun?  You bet.