Saturday, 25 September 2021

Humula Station building - 1

 Humula Station construction starts

Plus an auction & repair

Humula station was opened in 1917, with the first stage of the line from Wagga Wagga to Tumbarumba.  Officially closed in 1975, with the last train departing in 1974.

In 1973, a CPH #7 railmotor pauses at Humula.


The station never had an awning, and didn't seem to match any standard NSW station design that I could find.  The below are images from the internet, sent to me, or scanned with permission from the small booklets produced by Tumba Rail on the Tumbarumba line  

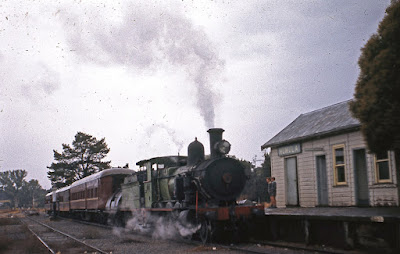
3142 and 3020 on a 1965 ARHS tour train watering at Humula. The station and signalbox are visible ahead of the train.


1965

Tour train

Last train leaves Humula in 1974 with the remaining wagons, just a week before flooding washed out the bridge at Tarcutta. 


Station building, and signalbox.  The sign on the signalbox says "office"

Without a plan, or measurements, I based my drawing on the door and window dimensions from a standard PC3 station.  The length was a bit of a guess, but I have tried to maintain an equal spacing with the 6 vertical battons on the platform side.  The rear of the station remained a mystery, and thanks to Mark Pottie, who sent me a better image of a tour train than the small image (of the same picture) in the Tumba Rail booklet, I had some idea

This is my only picture of the rear of the station, and one has to look beyond the signal box to see 2 windows, and a loading platform.  The train is the 1965 tour train, and the background has many more structures, including a sawmill that will eventually be modelled. Thanks to Mark Pottie for the image


My quick scale drawing.  Interior details are a guess.  The middle room is identified as a waiting room, but as the station office is in the signalbox, the large room on the RHS is a bit of a mystery.  Other things to note - windows are a sash design, without the vertical mullion, and there was no chimney visible on any of the pictures I have.


Station rear.  I am using an Evergreen styrene 0.060 V groove x 0.040 sheet. I have always struggled to cut out window openings, but this method seems to work for me. After cutting around the window openings, I use a dremel cut-off disc to melt a pair of diagonal slots through the styrene.  Then, I continue the cut with a#11 blade hobby knife to the previous cut.  Snapping off the styrene "triangles" follows the score and snap techique often described.  Cleanup with a file, or carefully with a knife.  

All 4 walls, floor, and interior walls cut.  The roof vents in the gable ends will need to be cut before assembly.


An auction
At the beginning of this month, a well known auction house in the Blue Mountains was having their regular 1st monday auction.  Well worth a look at their on-line catalogue, occassionly find something that one can use

With covid restrictions, all you get is a single photograph to whet your appetite. The auction is conducted through the web.

I wasn't planning to bid on this lot pictured below, as it had a start price of $25 and the description said fair to poor condition.  However, no bids, and the auctioneer dropped the start price to a miserable $15, which was encouragement enough. With no other bids, I won this lot for $15. 

As shown in the catalogue:- there was a good K wagon, an S truck, a pommy brakevan,  a number of other wagons which didn't have wheels, kadee couplers, two containers, and a tank load. Not the best presentation

There is an 18.5% commission on internet bids, plus a cost of postage and packing, that includes a commercial hourly rate for the packing.  

 It wasn't the only thing I bought, and the share of the postage for my wagons was just under $12.  So, about $30 investment.

Australia post took about 2 weeks to deliver.  The box contained the above pictured models, plus some extra bits and some 26mm axle length wheelsets.  The wagons were in a sorry state.

Here is the results of the repair:-

Epoxy Rails North K truck. The loose underframe visible in the auction picture belong to this one. Reunited, lacks brake wheel, but nice runner 
Calipari S truck kit.  The heavy di-cast tank load removed, and the 25mm axle length wheelsets replaced with 23.8mm axles I had in store.  Brass bearings had been fitted.  Now rolls nicely.  Needs brake wheels


Calipari ABV van had only one sideframe, but the other sideframe was loose in the box. Using the 25mm wheelset from the S truck, glued the other sideframe in postion.  Also missing brake wheels 

Lloyds or Protype ABV van. Whitemetal. Missing wheelsets, but did have bearings.  23.8mm axle wheelsets installed, and a great runner

Austrains K truck. Only removed the container. Good runner


Protype S truck. Whitemetal.  Removed the horrible tarp, and again, installed 23.8mm wheelsets.  Good runner, but will need a repaint.


All up, even with the extra cost of the 23.8mm axles, I am happy with my auction win as most of the wagons could be used on the layout.  

Another repair.

Last week, a mate asked me to have a look at a Bergs C30T he had just got out of storage.  He could not get it to run
Bergs C30T - model dates from around 1981, made by Kumata (japan).  3028 has been custom painted, and lightly weathered.  

After removing the body (3 screws), the cause of the failure was obvious. The rubber link from the motor to the gearbox had failed.

Replaced the rubber with neoprene tubing, and a light lubrication on the mechanical moving parts

The repair took under an hour, and most of that time was spent trying to locate my neoprene tubing.  Reassembled, it runs sweetly.

---------
Until next time.

Wednesday, 1 September 2021

Borambola Station Building - 2

Borambola Station and a platform diorama


At the last post, I was left with the fabrication of the roof, and painting 

A sneak preview of the finished model.  Picture taken from my backyard.  Our rescue horse Sammy, has photobombed the picture, but does show a scene that would be possible with photo backdrops on a model layout.  Read on to find out how I got to this stage.


Station building completion


Painting finished.  Some weathering needed.  The guttering downpipe is already in place, and the roof is removeable.  I had to use a flash to show up the inside seating


 Finishing the station turned out to be rather faster than expected, so I decided to place it on a small diorama

Platform, and diorama

I recently made a few platforms faces, and used the small styrene platform as the basis for my model.  It is shorter than the prototype, but it fitted my other criteria:- easier to store; space for the water tower, and toilet blocks; may be able to be installed as is on the future layout; and lastly, I had a piece of plywood of appropriate size hanging around.


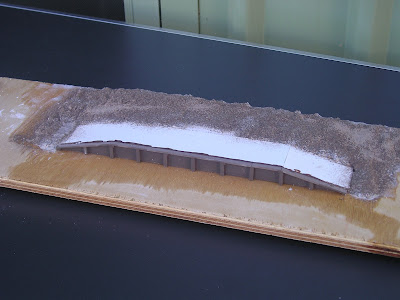
Platform pieces assembled, and spray painted with a mix of Tamiya "Red Brown" and Tamiya "medium Grey"


0.040 Styrene sheet added for the platform and support.  A small rebate on the rear of the platform top made to allow the station building to sit correctly. 

Station and platform with the polystyrene on the plywood surface.  The track at this stage is removeable.

I use a hot wire forming tool to roughly shape the polystyrene without too much mess.  Although, the final shape is achieved with a course sandpaper, and a vacuum cleaner to suck up the white dust


Sculptamould mixed and applied to give some texture.  Whilst this is was wet, some brown grout sprinkled on

Station placed on the diorama base.  

I covered many of my scenery techniques in my series on the Bethungra N scale layout a year ago, so I am not going to repeat them here.  (search for it in the search area on the top RHS of this blogpage)  But I will mention, the visible white sytrene platform top is lower than the platform edge capping, which gives me around 1mm of depth for the sand layer on top of the platform

Little details

Search as I could, I could not find my NSWGR resin water tanks.  So the option was to make ones own out of styrene and aluminium.  

Three blank styrene discs whittled from sheet styrene.  Then Brunel Models corrugated iron making tool used to make the tank, and progressively rolled around smaller and smaller diameter tubes to get it sized right 

Strip styrene used for the base.  Tank painted with Tamiya flat aluminium

Downpipe off the station will be fitted once the tank is installed on the diorama

The station was reported to have the station name over the doorway.  I was not sure what size it needed to be, so I made a small word document with different sized fonts, and printed it on paper.  Styrene cement used to glue the paper to styrene, and I had 2 signs to check


Both signs would be suitable, although the larger sign was selected


Finally the photos

Tuesday was the last day of winter, although I suspect spring came early.  The canola fields in the background has been out for around 3 weeks.  I set up the portable table in my backyard, and used the sunlight to illuminate the scene.  The only tweaking I have done, was cropping the images.  


Weathering on the station, but none on the water tank.  This will be corrected when I also fix the unwanted angled water tank deck.  The station platform top is fine sand, with a dusting of earth coloured plaster - TUFT brand which hasn't been available for over 30 years.  Grass foliage is Woodland scenics, and Faller.  (I must learn how to do static grass at some stage.)

A railmotor provided the passenger service on the Tumbarumba branch to 1974.  The angle of the sun in this picture would be correct for the prototype station in late afternoon.  The CPH railmotor is a Samhongsa brass import imported by Bergs Hobbies over 30 years ago.  


Hope you all are staying sane during this lockdown.  Stay safe, and build a model or two.

Until next time