NMRA -Achievement program
One of my
companions on my Model Railway journey is the National Model Railroad Association
(NMRA). It might seem strange to credit
the association, but without them, I doubt the hobby, and my own modelling
would have progressed.
 |
| Northbound Southern Aurora, running very late, doesn't stop at Wagga Wagga station. This image, as well as others, are ones I have accumulated to show operation of trains through Wagga, something that I hope to simulate with my yet to be built layout. Image from the internet, I do not know the photographer. |
A quick history
The NMRA
was set up in the USA nearly 100 years ago,
with aims to provide a consistant standard to manufacturers' of models,
to enable compatibility between brands.
It was also to allow the sharing of ideas, and to
advance the hobby. To those many unsung
pioneers, I thank you.
The
association grew in North America organised into a number of geographic
regions. And the association also
welcomed international members, with regions established in Britian, and Australasia. The Australasian region was known as the
Southern Cross Region, but there was a break away in the 1970s, and SCMRA is
now totally separate, with AMRM as the association magazine. However, some former NMRA members were not
happy with this arrangement, and after a campaign, were able to re-establish an
Australian Region of the NMRA in 1984.
As modellers in this country, we are blessed with 2 associations.
I joined
the NMRA in 1990, after attending an NMRA
meeting in Canberra, at Graham Hodges abode in Belconnen. I liked what I saw, and members in
attendance, primarily from Sydney, were friendly, and happy to share ideas.
The 1991
NMRA convention in Denver was put on my calendar, and combined with a holiday,
my horizons were broadened to what was possible. These week-long conventions can be addictive,
I also attended Portland in ‘94, Long Beach in ‘96, Seattle in 2004, and
Portland (again) in 2015. In addition,
there were quite a number of shorter conventions here in Australia, the next
one being at Rosehill in October.
The NMRA Achievement program
The
achievement program was started in 1961, and has 2 main aims – to recognise
those individuals who are supporting the Association, and the wider Model
railway community; and to challenge and improve the personal modelling
standards of the member. It is not a
contest.
The main
categories are
Service
to the hobby:- Association official; Association Volunteer; Author
Model
Railroad Equipment:- Master builder motive power; Master builder cars
Settings:-
Master builder Structures; Master builder Scenery; Master builder Prototype
Models
Engineering
and Operation:- Model Railroad Engineer (civil); Model Railroad Engineer
(electrical); Chief Dispatcher
Full
details of the achievement program can be found on the NMRA websites.
My own
experience in the Achievement program.
In 2006, I
had accumulated sufficient points to apply for the Authorship Category
award. This is one of the categories “Service
to the hobby”.
Around 2011,
I completed the Model Railroad
Engineer(electrical) category
Most
modellers who have a model train layout have an advantage in many of the
categories, although lack of a layout is not a huge impediment. What is harder, is being geographically
distant, or isolated from judges.
Master Builder Structures
Anyone who
has been following my blog, will know that building structures has been a major
component. I could see that my modelling
standards were steadily improving. My
intention was always to get the models assessed, but I rarely completed detailing the models,
before starting on the next project.
After all, I figured that without spending the time detailing, would
give me more time to make other structures.
Detailing could always be performed later.
That changed
2 months ago. I received notification
that the Achievement Program judge for Div 2 of the AR region was planning to
move to Queensland, and that would really delay any future assessment. So, I collected up a varied selection of
models that in my assessment, may achieve merit standards (87.5 marks out of a
possible 125), and then “completed” them, along with the task of filling out
the paperwork
In short,
the structure category needs 6 out of 12
models to achieve Merit, 6 models out of the 12 must be scratchbuilt,
and one model has to be a bridge
And on
Wednesday, I made the 2+ hour car trip towards Canberra, where Stephe, and Ross
assessed my models. Below are the
results.
The
models and judging results
Ladysmith Station building
This is a Walkers
NSW A4 laser cut wood kit, but modified and detailed to match the station
building at Ladysmith.
-
Construction(workmanship):
28 points out of 40
-
Detail
(Quality and amount): 13 out of 20
-
Conformity
(to prototype practice): 24 out of 25
-
Finish
and lettering (general appearance): 22 out of 25
-
Scratchbuilt(parts
added by the modeller): 4 out of 15
TOTAL: 91
points out of 125. This model MET Merit standards
Kyeamba Creek bridges
This model
was recycled from an earlier layout. It
started as a Quality Scale Models NSW 4 span timber trestle kit, but enlarged
to 9 spans, crossing 2 creek openings.
It is scaled to be as close to the real bridges near Ladysmith, and
presented on a diorama (which is not judged)
 |
| One of the 2 bridges of the diorama. Wombat models C30T placed for effect |
-
Construction(workmanship):
35 points out of 40
-
Detail
(Quality and amount): 18 out of 20
-
Conformity
(to prototype practice): 23 out of 25
-
Finish
and lettering (general appearance): 20 out of 25
-
Scratchbuilt(parts
added by the modeller): 10 out of 15
TOTAL: 106
points out of 125. This model MET Merit standards
Paddlesteamer
This model
was scratchbuilt around 20 years ago, out of wood, and brass, using plans from
the LJ Models P.S. Pevensey. I included
it to show my proficiency in using wood, as the model has quite a number of
subtle curves, and not a simple box
 |
| The heavy varnish finish is fine for a mantlepiece display model, but lost me points for a scale model. Cargo is via ebay, and only secured with blu-tac |
-
Construction(workmanship):
16 points out of 40
-
Detail
(Quality and amount): 13 out of 20
-
Conformity
(to prototype practice): 11 out of 25
-
Finish
and lettering (general appearance): 12 out of 25
-
Scratchbuilt(parts
added by the modeller): 15 out of 15
TOTAL: 67
points out of 125. This model DID NOT meet Merit standards. Judges considered the model was toylike in
appearance
NSW 60’ turntable
This model
was scratchbuilt mainly from brass.
Since my earlier blog posts on constructing this model, I added some
side ribbing, as well as painted and weathered the model
 |
| The approach roads, and general scenery are awaiting for the turntable to be installed on the layout. The turntable is manual, just like the prototype, and will be placed close to the aisle for operators to easily turn the locos |
-
Construction(workmanship):
28 points out of 40
-
Detail
(Quality and amount): 12 out of 20
-
Conformity
(to prototype practice): 15 out of 25
-
Finish
and lettering (general appearance): 12 out of 25
-
Scratchbuilt(parts
added by the modeller): 15 out of 15
TOTAL: 82
points out of 125. This model DID NOT meet Merit standards. Judges considered the model was too small,
and not sufficiently detailed.
Murrumbidgee River Bridge
This model
was kit bashed from two Uneek 159’ Whitten span brass kits, and 3 sets of cast
piers. Extensive rework to match the Murrumbidgee river bridge, and to
scratchbuild the bridge track (the kit assumes flex track which doesn’t look
right). Presented in a “ready to be
assembled” state, due to the space requirements for a built diorama, and future
placement on the layout
 |
| Archive image of my model bridge from 2019. Since then, my model was broken into subassemblies for storage |
-
Construction(workmanship):
38 points out of 40
-
Detail
(Quality and amount): 19 out of 20
-
Conformity
(to prototype practice): 21 out of 25
-
Finish
and lettering (general appearance): 23 out of 25
-
Scratchbuilt(parts
added by the modeller): 7 out of 15
TOTAL: 108
points out of 125. This model MET Merit standards
Aerial Rope tower
This
freelanced O scale model was mostly scratchbuilt from brass, and was inspired
by the Hercules Haulage towers beside the highway at Rosebery on the west coast
of Tasmania. I drew my own plans, and
built the model for the small diorama contest at the 2017 Narrow Gauge convention
in Geelong.
-
Construction(workmanship):
39 points out of 40
-
Detail
(Quality and amount): 19 out of 20
-
Conformity
(to prototype practice): 23 out of 25
-
Finish
and lettering (general appearance): 23 out of 25
-
Scratchbuilt(parts
added by the modeller): 15 out of 15
TOTAL: 118
points out of 125. This model MET Merit standards
Wagga Wagga station
This scratchbuilt
model took over 2 years to make, and is mostly of styrene construction, with
some brass, including specially commissioned etched brass for the distinctive
ironwork. I covered the construction of
this model extensively in earlier posts on this blog.
 |
| The railside view (the roadside view is on the header of this blogpost). This side of the station won't be viewable from my layout aisles |
-
Construction(workmanship):
39 points out of 40
-
Detail
(Quality and amount): 19 out of 20
-
Conformity
(to prototype practice): 23 out of 25
-
Finish
and lettering (general appearance): 24 out of 25
-
Scratchbuilt(parts
added by the modeller): 14 out of 15
TOTAL: 119
points out of 125. This model MET Merit standards
Bomen station
This
scratchbuilt model of styrene construction, with plans I made myself. I covered the construction of this model
extensively in earlier posts on this blog.
 |
| Railside view. Since my original blog posts on construction of Bomen station, I have added downpipes, and platform signs |
-
Construction(workmanship):
39 points out of 40
-
Detail
(Quality and amount): 18 out of 20
-
Conformity
(to prototype practice): 24 out of 25
-
Finish
and lettering (general appearance): 22 out of 25
-
Scratchbuilt(parts
added by the modeller): 15 out of 15
TOTAL: 118
points out of 125. This model MET Merit standards
56 Lever Wagga signal box lever frame.
This is
approx.1:10 scale. This frame matches
the real frame in the former Wagga signal box, and is an operational model,
built to cope with the 1:1 scale operator hands, I built the model over 2 years, in
1997-8. This model was not a kit, but steel
metal laser cut parts were obtained from “MacKenzie in H.O.Lland”, and then
hand machined, as Mackenzie had a number of deliberate faults to stop
intellectual theft. Each lever is
connected to a cam, and future mechanical interlocking is possible. A description of the theory of interlocking
can be found in an earlier post on my blog.
The lever plates are paper
“decals” on brass strip to match Wagga – in the future these plates will be
replaced with etched versions
 |
| This model is on the same table the showed the Murrumbidgee Bridge model earlier, and is quite a large and weighty model |
 |
| Closeup of the levers. The paper labels did not print out as well as I hoped, but are accurate to the original descriptions |
-
Construction(workmanship):
39 points out of 40
-
Detail
(Quality and amount): 16 out of 20
-
Conformity
(to prototype practice): 22 out of 25
-
Finish
and lettering (general appearance): 24 out of 25
-
Scratchbuilt(parts
added by the modeller): 11 out of 15
TOTAL: 112
points out of 125. This model MET Merit standards
Docker Street Gatekeeper cottage
This
scratchbuilt model of styrene construction, with plans I made myself. I covered the construction of this model
extensively in earlier posts on this blog.
 |
| When I was showing this model at the July NMRA meeting, Ross asked me about why there was a lack of window sills. My prototype photos failed to show the bottom of the windows, but I checked an archive picture of the Ettamogah gatekeeper cottage, and it did have sills, so sills have been added. |
-
Construction(workmanship):
36 points out of 40
-
Detail
(Quality and amount): 18 out of 20
-
Conformity
(to prototype practice): 24 out of 25
-
Finish
and lettering (general appearance): 20 out of 25
-
Scratchbuilt(parts
added by the modeller): 15 out of 15
TOTAL: 113
points out of 125. This model MET Merit standards
Wagga Wagga Signal Box
This
scratchbuilt model of styrene construction, with plans adapted from Greg
Edwards Data Sheets, and based on my own photos from pre 1983, and others. I covered the construction of this model
extensively in earlier posts on this blog.
 |
| I added an interior to the signalbox. The levers and block instruments match a real photo supplied by Bob Taaffe, but the window side is a guess. The desk, chair, coal bucket, block instruments, and minature staff instruments were all scratchbuilt from styrene. Seriously small details |
 |
| Accurate angle - mimicks the view from the footbridge. The signalbox was removed in 1983 |
-
Construction(workmanship):
29 points out of 40
-
Detail
(Quality and amount): 18 out of 20
-
Conformity
(to prototype practice): 22 out of 25
-
Finish
and lettering (general appearance): 23 out of 25
-
Scratchbuilt(parts
added by the modeller): 14 out of 15
TOTAL: 106
points out of 125. This model MET Merit standards
Ladysmith Toilet and lamp room
This
scratchbuilt model of styrene construction, with metal foil cladding, using
plans from Greg Edwards Data Sheets, and my own photos. This was my first scratchbuilt prototype
model in styrene, and I treated it as a learning exercise. I covered the construction of this model in
an earlier post on this blog.
-
Construction(workmanship):
21 points out of 40
-
Detail
(Quality and amount): 12 out of 20
-
Conformity
(to prototype practice): 21 out of 25
-
Finish
and lettering (general appearance): 13 out of 25
-
Scratchbuilt(parts
added by the modeller): 15 out of 15
TOTAL: 82
points out of 125. This model DID NOT meet Merit standards. Judges said it was just a bit too small to
accumulate enough points.
=====================
To hedge my
bets, I had included some other models that were subsequently not registered on
the Statement of Qualification Form. Included here for completeness
5 Tonne yard crane
This is a
Stephen Johnson brass kit, and has a reputation (well earned) to be difficult
-
Construction(workmanship):
35 points out of 40
-
Detail
(Quality and amount): 5 out of 20
-
Conformity
(to prototype practice): 20 out of 25
-
Finish
and lettering (general appearance): 15 out of 25
-
Scratchbuilt(parts
added by the modeller): 0 out of 15
TOTAL: 75
points out of 125. This model DID NOT meet Merit standards. Being a detailed kit, adding extra details
was not really an option. Thus , it would have failed the Structure Category
rules, even if it did reach merit, and as such, I could not include it in the
Statement of Qualification
6 Lever Ground frame.
This is
approx.1:10 scale. I built the model in
around 1995, using kit parts supplied by “MacKenzie in H.O.Lland”. It is fully interlocked to my design, and
represents a ficticious branch coming off a main line. The lever plates are varnished paper “decals”
on brass strip
-
Construction(workmanship):
30 points out of 40
-
Detail
(Quality and amount): 7 out of 20
-
Conformity
(to prototype practice): 17 out of 25
-
Finish
and lettering (general appearance): 22 out of 25
-
Scratchbuilt(parts
added by the modeller): 5 out of 15
-
TOTAL:
82 points out of 125. This model DID NOT meet Merit standards
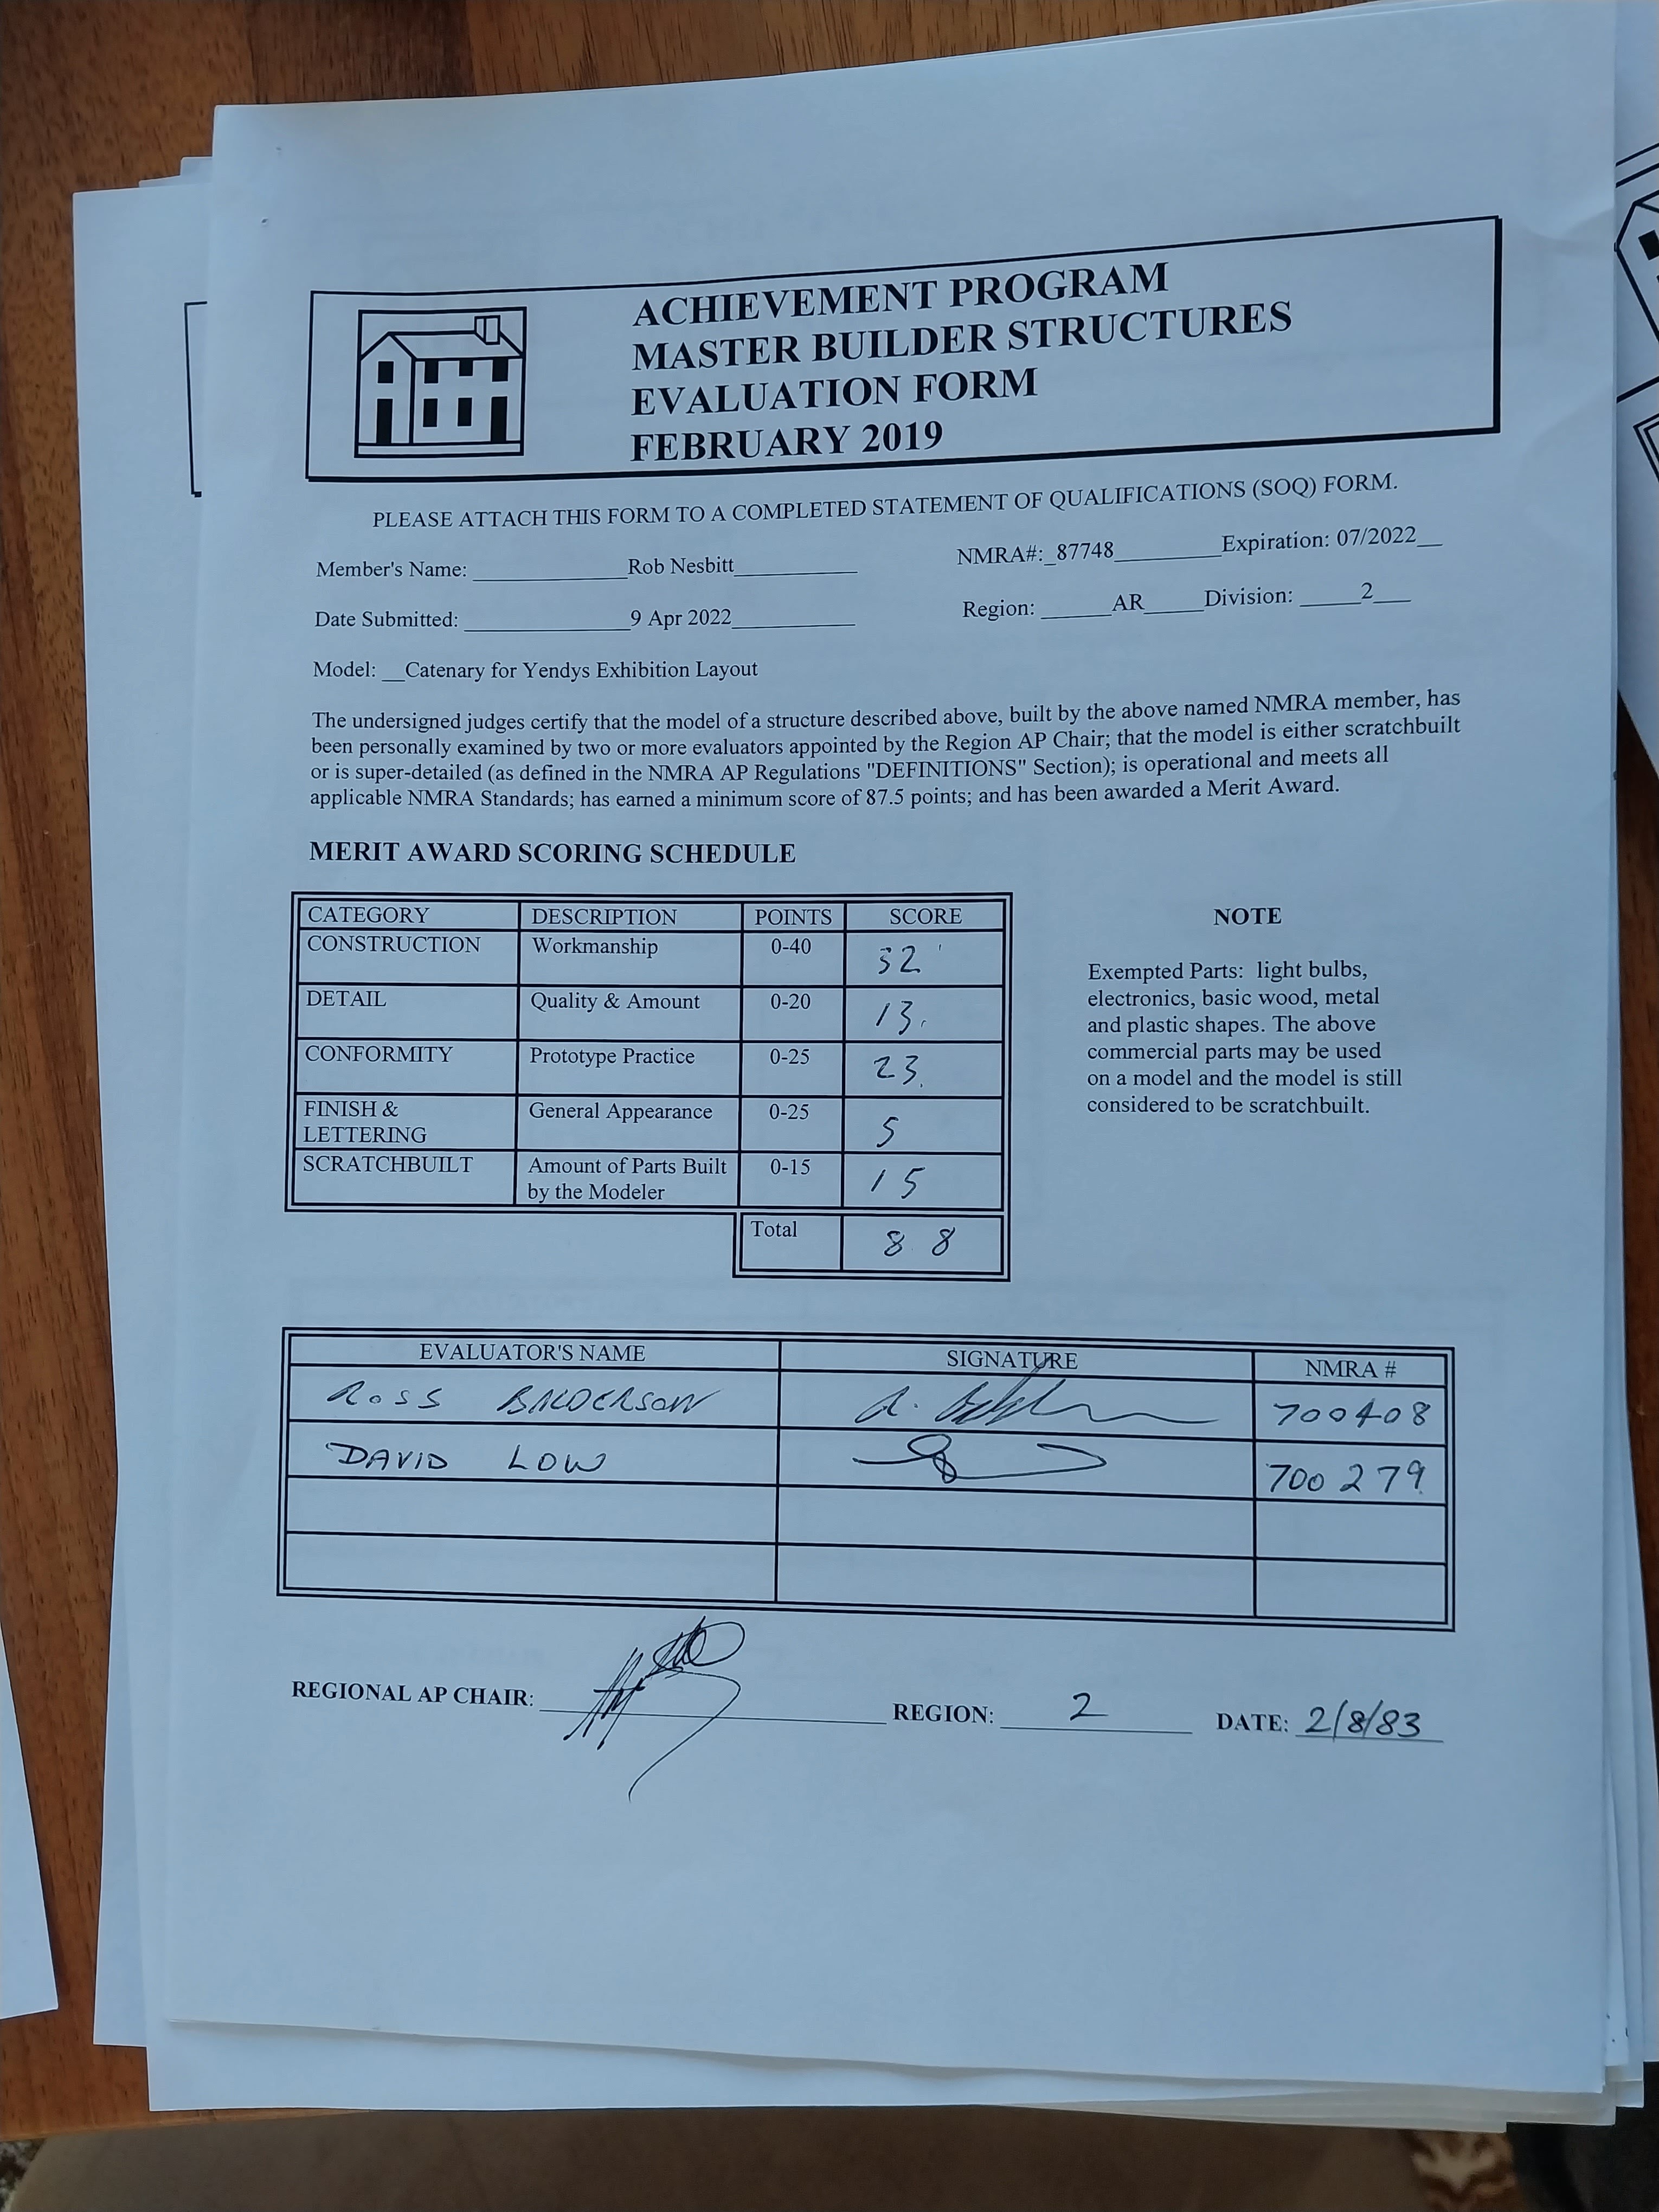
Catenary for Yendys Exhibition layout
After
asking the question at an NMRA x online convention during Covid, I asked a
question to the ‘Ask the MMR’ segment. “How do members, who are remote from judging,
participate in the AP program?”. After a
long pause, Arthur Hayes MMR, suggested that one needs to take lots of photos,
and if possible write it up in the region magazine “Mainline” . Well, this is what I did, and then sent the
paperwork through to the DIV 2 judge.
Yendys exhibition layout had been seen on the exhibition scene for over
10 years, so it was a well known subject for this test. Well, the judging took around 8 months. I consider this aspect of remote judging to
be a serious question to be considered for the USA based NMRA BOD, as the
process needs to be formalised.
 |
| The catenary almost disappears into the scene, which is just the lacy effect I wanted |
-
Construction(workmanship):
32 points out of 40
-
Detail
(Quality and amount): 13 out of 20
-
Conformity
(to prototype practice): 23 out of 25
-
Finish
and lettering (general appearance): 5 out of 25
-
Scratchbuilt(parts
added by the modeller): 15 out of 15
TOTAL: 88
points out of 125. The Catenary model MET Merit standards
Paperwork
Prior to
judging, paperwork needed to be filled out.
Here is a copy of my paperwork forms for the Yendys catenary, and the Statement of Qualifications. It can be time consuming to fill out, but it
is possible to access a word template on the website, which helps the judges to
read, as well as making corrections easier.
 |
| The Statement of Qualification sheet is to be sent to the Region AP chair, along with details of all the models listed. Yes, paperwork is a necessary evil, and tends to put people off the Achievement Program. However, if you have spent 100s of hours on a model, the extra 30 minutes to fill out the paperwork is not that bad a tradeoff |
Summary
I thank
both Ross and Stephe (and David earlier) for their patience, and time in
viewing, and judging my models. I would
have been disappointed if this aspect had been glossed over, and rushed. Yes, they did find a few (quite a few) flaws
in my models, and that is an aspect that will help me in future modelling. Overall, I thought they were generous in
their mark awarding, but I am also my harshest critic. However, I trust that the analysis, and
description of the models judged can help guide others to challenge
themselves.
I will
await the necessary time for the paperwork to be received, and assessed, and
finalised by the AR region AP
chair. I am in no rush – I have more projects on the
go to keep me fully occupied.
More of
that in my next blog post.
Until next
time, build a model or two