For
those who were expecting another post on Wagga Wagga station painting? Sorry. Painting is progressing, and whilst I
am making good progress, I can only spend so much time on the workbench, before
my concentration gives out, and mistakes happen.
So,
in the meantime, I have reworked my layout sketches
 |
| 3801 excursion train approaches Junee April 5, 2021 after spending Easter running shuttles out of Albury. Photographed just before sunset. |
Wagga –
A layout designed for operation
It may be
of interest when you are viewing my trackplan sketch, to know some of the
philosophy behind the design.
One needs
to have a proper idea of what you want in a layout, and design it for that
purpose. I have based the operation on
real railway practices. The layout does
not have a long mainline, and running trains in scenery has taken a back seat
to my interests of signalling, and shunting.
Mainline passenger operations are simple. Having a mix of industries in
Wagga, and up to Tumbarumba should allow trains with a purpose. The industries are REAL – nothing is made up,
although the 1970 timeframe is stretched a bit to incorporate industries that
were established later, for instance - 1971 (Tooths) and 1974 (Barnes cannery) This is where research is really coming into
its own
My proposed
layout is prototypically based on Wagga, so in some ways, I already have limits
on what I can do, and can reference the Southern Region working timetable. But, it also has a need for 7 operators, and
it will be operated very much along the lines of a USA layout operation if
people are familiar with those.. Staging
yards will have already formed trains.
Some trains will simply run from one staging yard to the other. Some goods trains will need to drop, and
collect wagons in Wagga’s goods siding loops, to be shuffled to the 13 industry
sidings, in the Wagga yard area with an X200 shunter. Bomen station will allow mainline goods
trains some shunting. Local passenger
train to Tumbarumba is normally a CPH.
Goods trains to Tumbarumba are trains that will be made up in the Wagga yard
track, but the branchline can generate goods traffic that has destinations for
on-line sidings on the layout. The Wagga
signal box will be manned, and control the train movements on the visible
portion of the layout. A “train control”
position (dispatcher) is responsible for
ensuring trains enter, and leave the
layout from/to staging, by assigning drivers.
This will keep trains moving. A
CCTV system is available to the train drivers so they can watch their trains
entering, or leaving the staging yards.
Once a train has entered the staging yard, I do not expect it to
re-appear in the operating session – although the train controller has full
access to the staging yards, and can
shuffle a train from one staging yard back to the other using the “X” factor
layout design I am employing
The branchline
is quite long, and engine drivers will be able to shunt trains and wagons as
needed. Point control on the branch is
with wire in tube from the fascia – so eliminating complex electronics on the
branch. The main Wagga station area points
and signals are electrically controlled
from the level frame, with simple wires going to tortoise motors (or servos
still thinking about it). The only DCC
selectable complex electronics is for the route selection of the staging yards,
and that is assigned during an operating session by the dispatcher, not the
driver. The dispatcher will also have a
manual green/red signal for the train drivers prior to them entering the hidden
staging.
Room size –
9 metres x 6 metres – although there is an kitchenette and ensuite also within
this area
Walk around
control for all trains. Wireless an option, but lots of wired facia panels
Big width
aisles, with short pinch points only. – but we will see
Double
deck, with stations on the upper level staggered to not be directly over the
lower level stations.
Shelf width
only, apart from the Wagga yard – limits the scenery task to basically between
the fence line
Radius of
24” (60cm) on the branch, and sidings
28” (70cm) on the main.
Probably will use NCE DCC. Only a few locos will be sound equipped –
most will be non-sound DCC or sound turned off, as I find sound to be annoying
in a room if more than 2 trains have noise
makers.
Reseting the staging yards is via the “x:
factor design” and will probably take just an hour. But that will also test
almost all the locos needed for the operation session
The big concern with my design is access
to the hidden staging if there is a
fault/derailment -particularly as I will not have more than around 15cm of
clearance below the Bomen yard. Am
considering a fold up hinge for the entire Bomen station area, although that
complicates the trackwork joins, and electrics
 |
|


Notes.
Tumbarumba
1) Barracks building.
 |
| Barracks, as restored on the railtrail |
2) 60’ Turntable. Scratchbuilt Manual table, awaiting detailing and painting
3) Goods shed and 5 ton crane. Models have been made
4) Station building.
5) sawmill.
 |
| Image supplied by Mark Pottie |
6) Potato Shed.
 |
| Potato shed in the background. Photo by Graham Pegg |
7) stock yards
Humula. NB Trackplan not yet finalised – I may flip the station, and loading bank
8) stock yards
 |
| Remains of stockyard - 2020 |
9) Perway shed.
 |
Last train - 1974
|
10) Toilet block and lamp room
11) Loading bank – used for local timber mill etc
 |
ARHS tour 1965 shows station. G.Lillico picture
|
12) station building
13) Signal box
 |
1980 - 5 years after abandonment
|
14) Scooter's bridge – relocated from near Ladysmith – similar bridges near Humula
Borambola
15) Goods shed
16) station building shed and water tank
17) stock yards
Ladysmith
18) Station building
19) Signal box – (similar to the one at Tarcutta)
20) Toilet block and lamp room
21) Goods shed
21a) SM cottage
21B) Perway shed
22) Silo – part constructed
23) Kyeamba Creek bridges – built
Wagga Wagga
24) Boral
25) Esso depot
26) Tooths depot
27) Shell depot
28) Caltex depot
29) 60’ turntable – I have an Antons60 foot table
30) Barracks
31) Goods shed and crane
32) loading bank
33) Murrumbidgee Milling company
 |
I have more recent pictures, but may have to base my model on this early one, as the present size of the mill building is huge
|
34) Wagga Wagga station – under construction
35) SM residence
36) Signal box – made
37) Cottage and old gate keeper cottage
38) Best Street bridge
39) and 39a) Footbridge
40) BP depot
41) Hardys Timber siding
42) Wagga gasworks
43) Speed-e-gas depot
44) Trucking yards stock loading bank
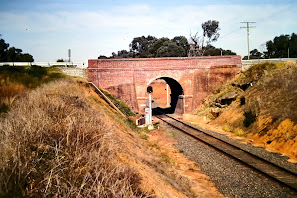
45) Urana Street crossing, and Kapooka road bridge (to act as a tunnel portal)
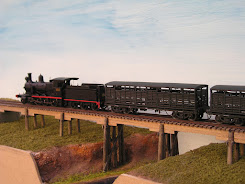
52) Murrumbidgee River Bridge – 2 spans constructed – viaduct flexible to fit available space
53) Gatekeeper cottage
 |
| Tony Macillwan picture. |
54) Edward Street level crossing
55) Docker street level crossing
56) 56 lever frame – 1/10 scale – Part built
Bomen
46) Wagga Abattoir, and stockyards
 |
| Site of former siding |
 |
| Shunting the abbatoir siding |
47) Barnes Cannery
 |
| Tracks in concrete still visible behind the gate |
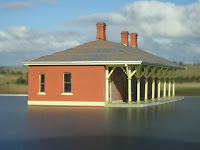
48) Station building and signal box – scratchbuilt.
49) Level crossing and SM residence – residence built
50) Hollanders leather works
 |
| 1990 aerial image of the Leather works |
 |
Siding, and dock. The new shed is on the site of the leatherworks
|
51) Shepherds Siding silos
Staging
54) Scissors crossover – X factor design element – Shinohara acquired
55) 3 metre staging sidings for long trains (eg Southern Aurora)
Final thoughts.
Sorry for the extended post. But taking inspiration from the prototype adds greatly to the authenticity. Most of the pictures are those I have taken myself - but without the efforts of others, I would have many gaps. Thankyou.
Construction of models for this layout will take a long time. But having a few already built will speed the layout construction. And most of the track in my plans is subject to refinement closer to the actual platelaying, so please don't be too critical.
Until next time


